A neighbour once carried his laptop to a repair shop for a fresh Windows install and paid for the privilege. The job took twenty minutes. The bill did not reflect twenty minutes of work. It reflected the fact that he did not know how simple the process is, and that nobody had shown him where the one dangerous click sits.
That click is the Format button during setup. Press it on the wrong partition and years of photos vanish in a second, with no undo. Press it on the right one and everything else survives untouched. This guide shows you how to install Windows 10 step by step with a bootable USB drive, including how to tell the right partition from the wrong one.
First, the honest part: Windows 10 in 2026
Microsoft ended support for Windows 10 on 14 October 2025. No new feature updates, no new security patches. Version 22H2 is the final version, and it is the one you will download here. For a newer computer, Windows 11 is the right choice. But plenty of older machines cannot run Windows 11 officially, or run it badly, and for those machines Windows 10 remains the practical answer. Go in with your eyes open: keep Windows Defender on, keep your browser updated, and be careful with downloads from unknown sites.
Installing Windows 10 is free, but using it activated needs a genuine licence — a product key you already own, or a digital licence linked to your Microsoft account. You can finish the whole install without a key and activate later. Avoid activator tools from random sites — they are a reliable way to infect a fresh install.
What you need before you start
You need a USB flash drive with at least 8 GB of space. Everything on it will be erased, so move its contents somewhere safe first. You also need a working computer with internet access to prepare the drive. That can be the same computer you are about to reinstall, as long as it still boots into Windows. Back up anything you cannot replace first: a clean install wipes the system partition completely. Keep the charger plugged in on a laptop.
1. Download the Windows 10 ISO the easy way
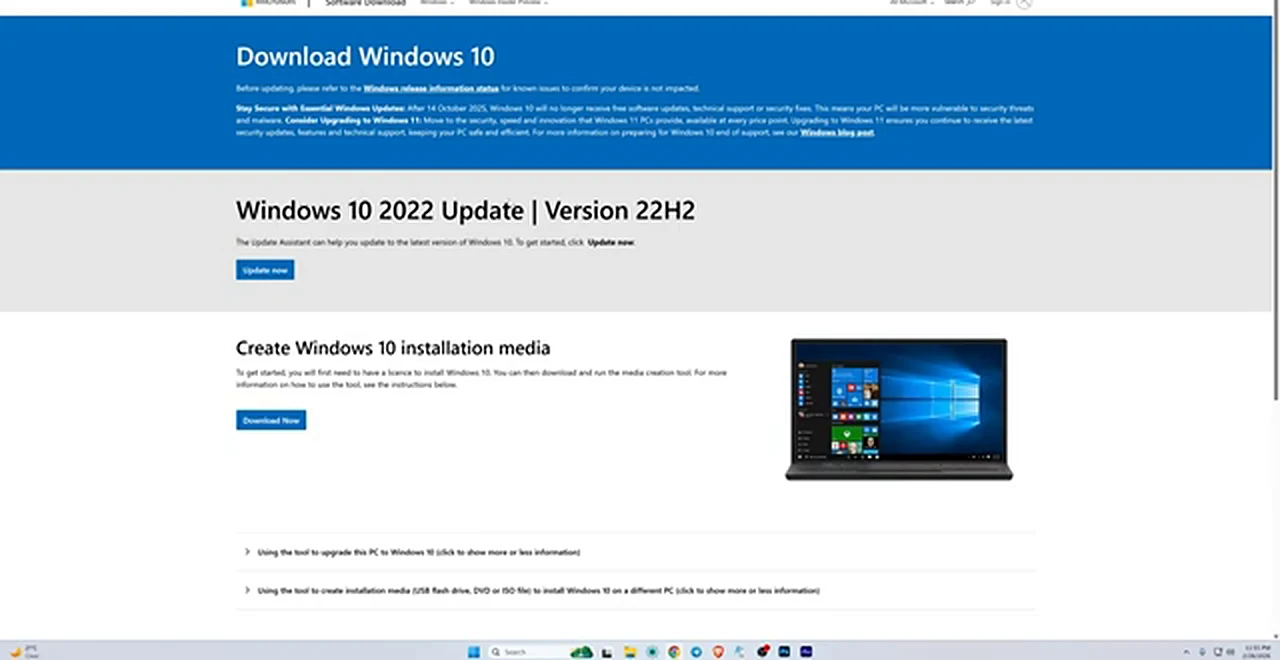
Start on Microsoft’s own software download page for Windows 10. On a desktop browser, that page usually pushes you towards the Media Creation Tool instead of offering the ISO file directly. There is a simpler route, built into every modern browser.
Open the page in Chrome or Edge, press F12 to open Developer Tools, and click the small device icon that switches the page to a mobile view. Refresh the page. Microsoft now treats your browser like a phone, and phones get the direct download. Scroll to Select edition, choose Windows 10, and click Confirm. Choose English (United States), click Confirm again, and choose 64-bit Download. The file is roughly 6 GB, so let it finish completely. A half-downloaded ISO is the quiet cause of many failed installs that get blamed on the USB drive.
2. Check one setting most people skip: GPT or MBR
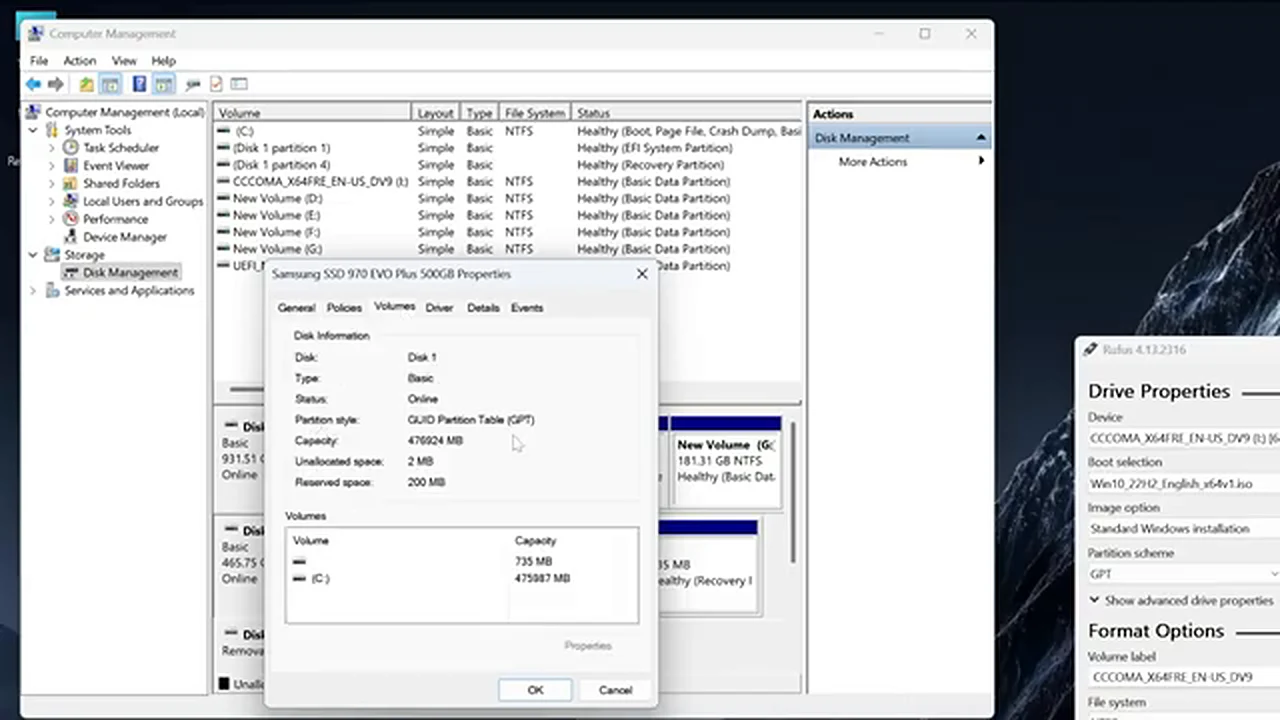
Before you build the USB drive, find out how your hard disk or SSD is partitioned. There are two styles, GPT and MBR, and the bootable drive must match the style of the disk you are installing to. Get this wrong and the installer may refuse to boot, or the computer may fail to start afterwards.
Press the Windows key, type Computer Management, and open it. Open Storage, click Disk Management, right-click the disk itself — the grey label that says Disk 0 or Disk 1 — and choose Properties. On the Volumes tab, look at Partition style. Modern machines show GPT, which pairs with UEFI booting. Older machines may show MBR, which pairs with Legacy booting. Whichever yours says, choose the same setting in Rufus next. If yours says MBR, do not convert it to GPT on the spot. Converting is a separate job with its own risks.
3. Turn the USB drive into a bootable installer with Rufus
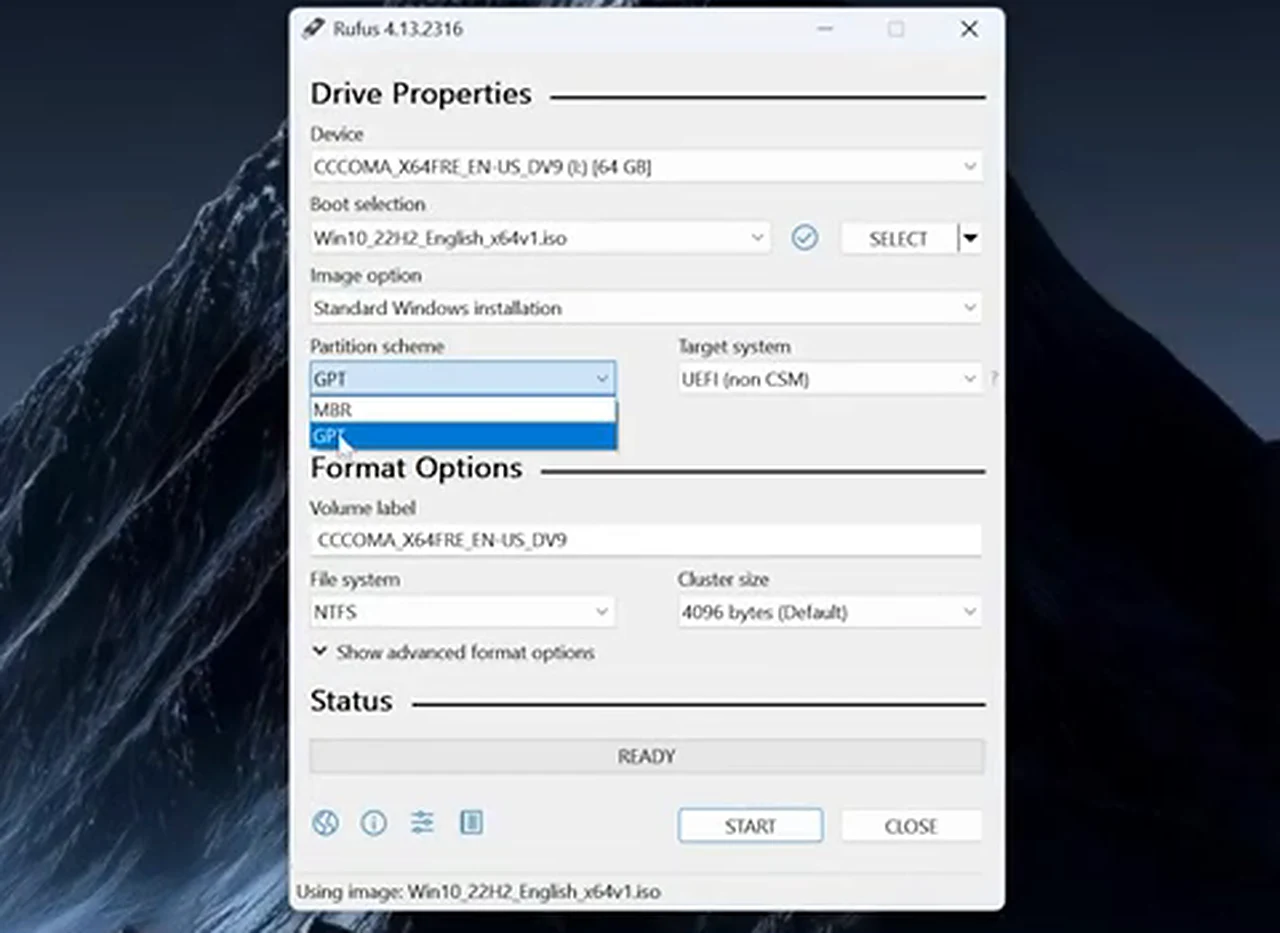
Rufus is a small, free tool that writes the ISO file to a USB drive and makes it bootable. Download it from the official Rufus website, rufus.ie. The portable version needs no installation. Double-click it, click Yes when Windows asks for permission, and you are in.
Plug in your USB drive and check that Rufus shows it under Device. If more than one removable drive is plugged in, double-check the name and size: the next steps erase the selected drive completely. Click SELECT, pick the ISO file, and set Partition scheme to match what you found above — GPT or MBR. The Target system box updates itself. Click START, confirm the drive letter when Rufus warns you, and click OK. When the status bar reads READY in green, close Rufus. Your installer is built.
4. Find your boot key before you restart
This is the part that trips up first-timers more than any other, because every brand does it differently. When you switch the computer on, a brief window exists where pressing a specific key opens the boot menu — a small list of devices to start from. Miss the window and Windows loads normally, and you restart and try again.
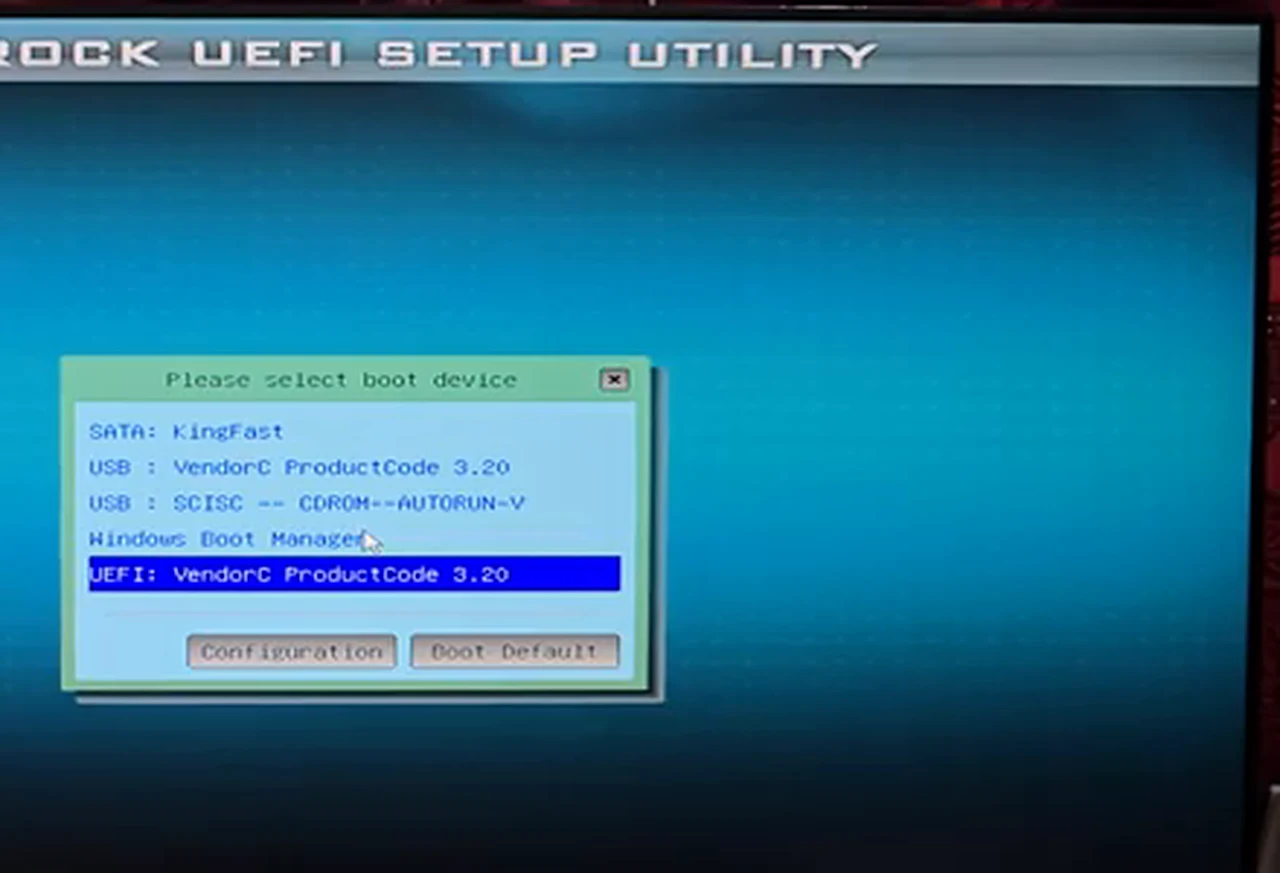
The key depends on the brand: F12 for Dell, Lenovo, and Acer, F9 for HP, F8 for ASUS, and F11 for MSI and ASRock are common ones, but they are starting points. Search your phone for your brand and model plus boot menu key. Note that the boot menu is not BIOS setup, usually opened with Delete or F2. It is a one-time choice: start from this USB drive, just this once.
Plug the USB drive in, switch the computer on, and start tapping the key straight away — do not wait for a logo. When the boot menu appears, choose the USB entry. If you built the drive as GPT, pick the entry that begins with UEFI. If you built it as MBR, pick the plain USB entry. Press Enter. The screen goes dark for a moment before the installer appears. That pause is normal.
5. Install Windows 10, screen by screen
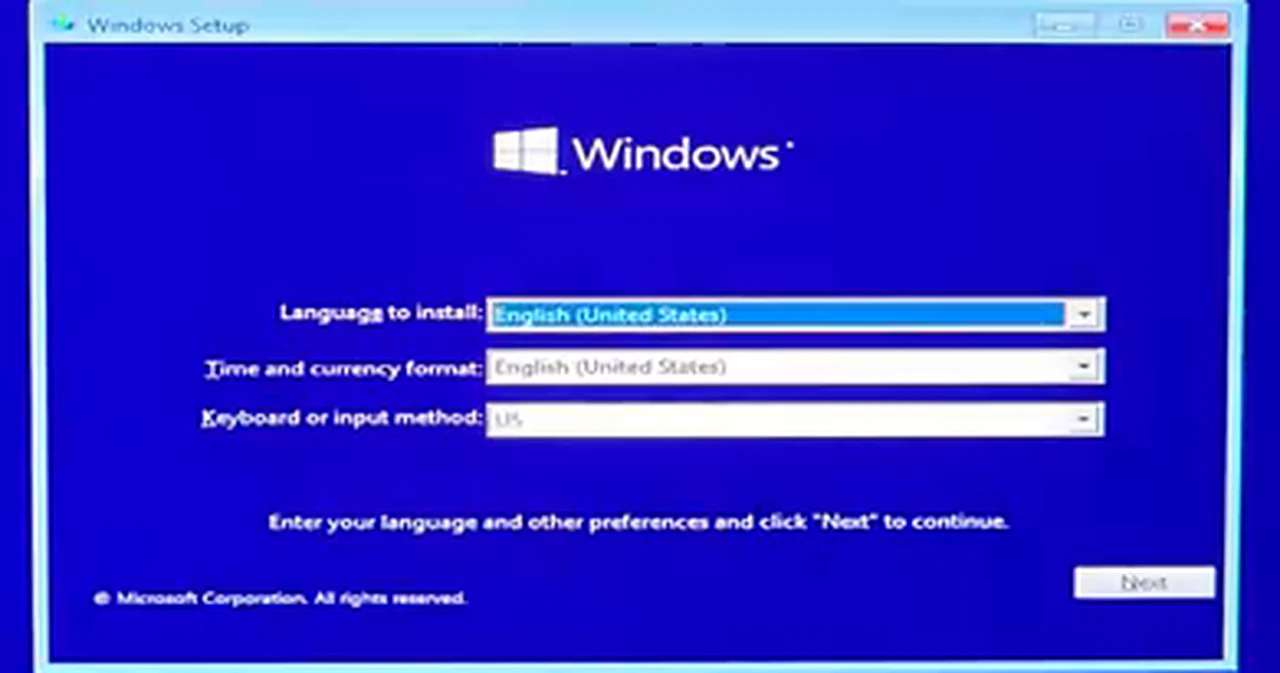
The first installer screen asks for language, time and currency format, and keyboard layout. English (United States) for all three is the safe default, with the keyboard set to US. Click Next, then Install now. The next screen asks for a product key. Click I don’t have a product key at the bottom. This lets you finish the install and activate later with a genuine key. Then choose an edition — Windows 10 Pro if you have a Pro licence or are unsure — accept the licence terms, and click Next.
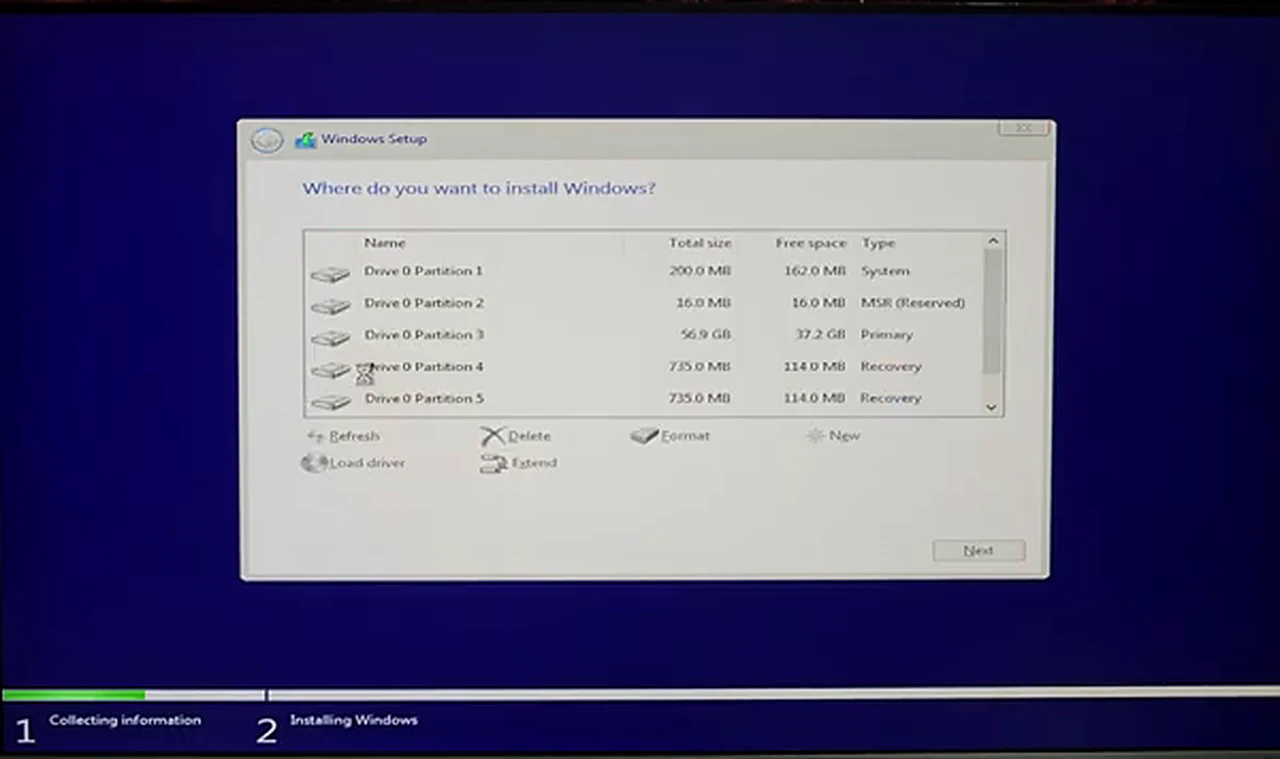
Now choose Custom: Install Windows only (advanced). The upgrade option would keep your files and settings, but a clean install is the point of this exercise. You now see a list of partitions. Your Windows system partition is usually the large Primary partition. Select that partition — and only that partition — then click Format, confirm the warning, and click Next.
Leave everything else alone. The small System, MSR, and Recovery partitions belong to Windows and the manufacturer, and the other large partitions may hold your files. If you cannot tell which partition is the system one, stop, boot into your old Windows, and note the partition sizes in Disk Management. Guessing here is how data gets lost.
The installer then copies files and restarts once or twice — roughly four to five minutes on an SSD, longer on a hard disk. Let it restart on its own. Do not press keys or pull out the USB drive mid-restart. When it finishes, the blue first-time setup appears.
6. The first-time setup screens
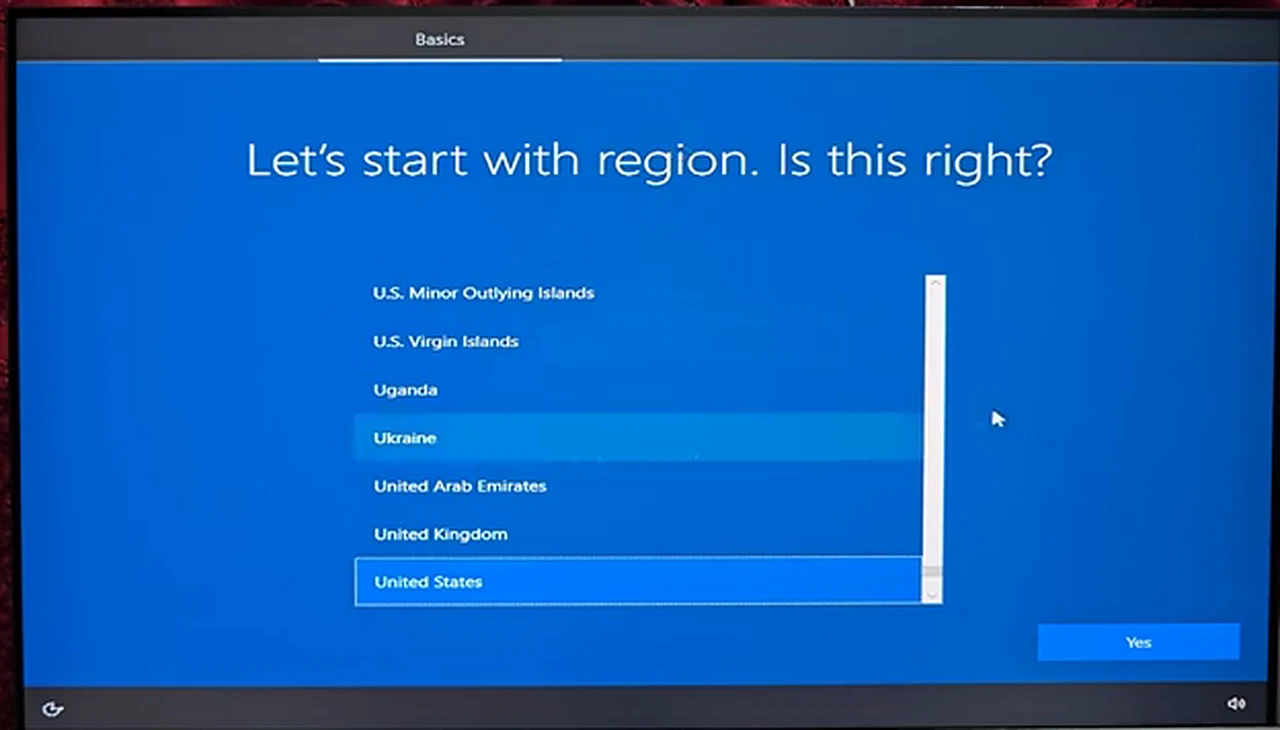
First, region: scroll the list to Bangladesh and click Yes. Next, keyboard layout: US is correct for most keyboards, so click Yes, then Skip when it offers a second layout. If the computer has no internet connection, click I don’t have internet, then Continue with limited setup. This creates a local account instead of forcing a Microsoft account sign-in.
Type a username and click Next. Then set a password, type it again to confirm, and answer three security questions. Pick answers you will genuinely remember. Then accept the privacy settings — the defaults are reasonable — and wait while Windows gets everything ready. Then the desktop appears. The install is done.
7. The .NET 3.5 fix older software still needs
Windows 10 does not include .NET Framework 3.5 by default, and plenty of older software still asks for it. The usual fix, through Windows Features, needs Windows Update to cooperate, which it does not always do on a fresh install.
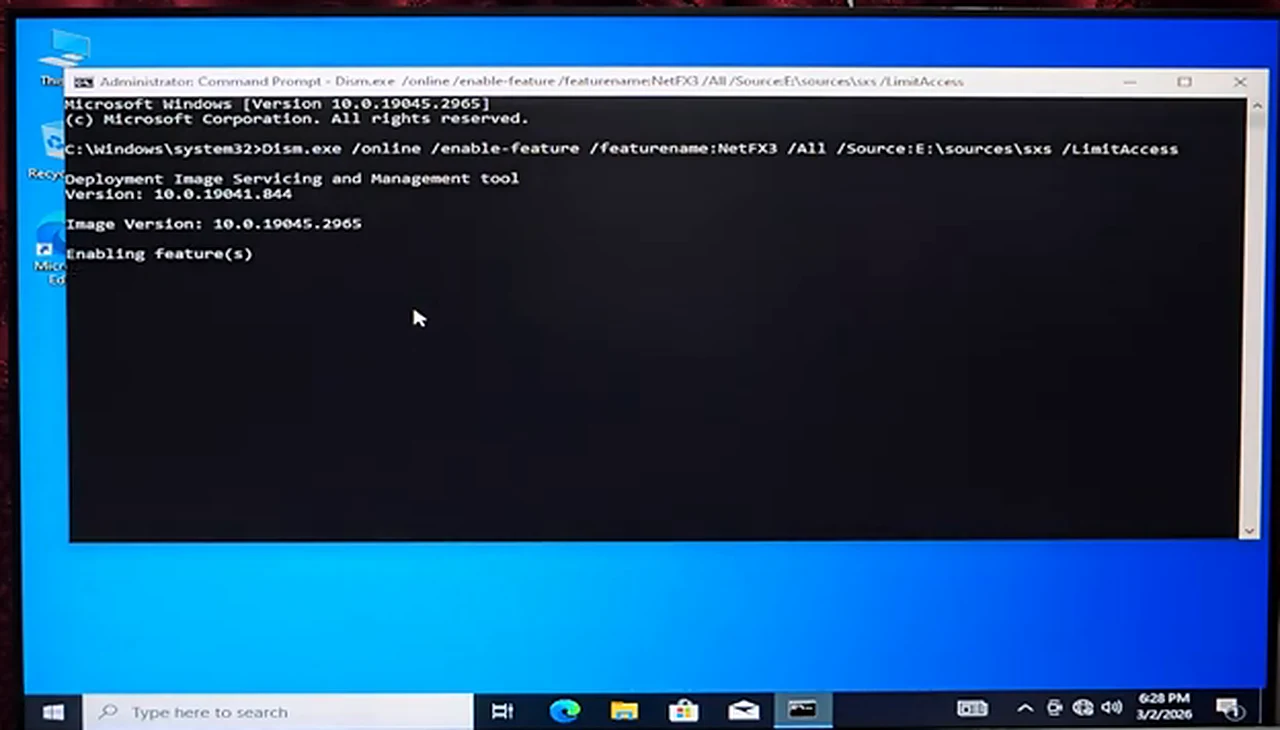
There is a faster way, using files already sitting on your USB drive. Open This PC and note the drive letter of the USB drive. In the video this was drive E, but yours may be D, F, or something else. The letter is the part you must get right. Press the Windows key, type cmd, right-click Command Prompt, and choose Run as administrator. Click Yes. Paste the following command, replacing E with your own USB drive letter, and press Enter:
Dism.exe /Online /Enable-Feature /FeatureName:NetFx3 /All /Source:E:\sources\sxs /LimitAccess
DISM enables .NET 3.5 from the install files on the USB drive instead of downloading it. If it fails, the drive letter is almost always the cause. Check This PC again, correct the letter, and run the command once more.
What to do first after install
The desktop is up, but the job is only three-quarters done:
- Connect to the internet and run Windows Update. Go to Settings, then Update and Security, then Windows Update, and click Check for updates. Update checks still deliver drivers, even though new security updates have ended. Install everything offered, restart when asked, and check again until it reports nothing new.
- Check your screen resolution. Right-click the desktop and open Display settings. If text looks blurry, the display driver has not arrived yet. That usually fixes itself once the driver updates land.
- Activate Windows with a genuine key. Go to Settings, then Update and Security, then Activation, and enter your product key, or sign in with the Microsoft account that holds your digital licence. If the computer was activated before on the same hardware, activation often happens on its own.
- Install a browser and your everyday software from official websites only, then restore your backed-up files. A fresh install is the one moment your computer is guaranteed clean.
- Check that sound, Wi-Fi, Bluetooth, and the printer all work. A missing driver shows up here, not in a dramatic error message. If something is silent or missing, the manufacturer’s support page for your model is the first stop. Then note down the boot key, GPT or MBR, and the edition you installed, for next time.
Frequently asked questions
Will installing Windows 10 delete files on my other drives?
A clean install wipes only the partition you format. Files on other partitions and other physical drives normally survive. Back up anything irreplaceable first, and double-check the partition list before you press Format.
Can I install Windows 10 without a product key?
Yes. Click I don’t have a product key during setup, finish the install, and activate later in Settings with a genuine key or a digital licence. Windows runs unactivated, with a watermark, until you do.
A clean install looks technical from the outside and turns out to be mostly patience. Download the ISO, match GPT or MBR, pick the right partition and no other, and give the first-time setup your real attention. The next time a computer in the house slows to a crawl, you will know exactly what to do.