Your everyday computer still runs Windows 10. The browser works, your documents open, and every folder sits where you left it. The trouble is the quiet feeling of being left behind: new software asks for Windows 11, security updates for Windows 10 have ended, and every guide seems to start with “back up everything and wipe the drive.” Wiping a computer full of photos, assignments, and installed programs feels like moving house with no boxes.
There is a calmer way. An in-place upgrade replaces Windows itself and leaves the rest of the computer alone. Files stay in their folders, installed programs stay installed, and the desktop looks familiar when you log back in. This guide shows that method: download the official Windows 11 ISO, unpack it on the computer, and run setup from inside Windows 10 with one extra switch that skips the compatibility block. First, though, comes the safety net. Do that part properly, and the upgrade itself becomes almost boring — exactly what you want.
Before and after: what changes, and what does not
Before the upgrade you have Windows 10, your files, your programs, your settings, and your password. After it, you should have Windows 11, the same files, the same programs, the same settings, and the same password. The Start menu moves and Settings looks different, but nothing on your C drive needs rebuilding from scratch.
| Before: Windows 10 | After: Windows 11 (in-place upgrade) |
|---|---|
| Documents, Downloads, Desktop, photos | Still in the same folders |
| Installed programs such as Office and browsers | Still installed |
| Wi-Fi passwords, wallpaper, most settings | Carried over |
| Windows, Start menu, Settings | Replaced with Windows 11 versions |
| Old Windows 10 system files | Kept briefly in a Windows.old folder |
That last row is your escape route. Windows keeps the old system for a limited rollback window. Treat your first days on Windows 11 as a trial: use the programs you depend on and open your oldest files. If something important breaks, you can still go back — but only if you do not delete that safety copy.
The safety net comes first
“Without losing data” is the goal, not a guarantee. A power cut mid-install or a failing hard drive can still ruin a day. Before you download anything, back up Documents, Desktop, Downloads, and Pictures to an external drive or a cloud folder. Save the odd items by hand too: license keys, login details, and the one spreadsheet only you understand. Check that the backup actually opens.
Plug the computer in and leave it plugged in. A laptop battery is not enough for this job. If power fails mid-install, Windows can be left damaged, and recovery then means a bootable USB drive and a fresh install. Aim for at least 20 GB free on the C drive for the ISO, the unpacked files, and working room. Note your login password, close every open program, and start on an unhurried afternoon.
Get the official ISO — and match your language exactly
Search for the Microsoft software download page for Windows 11 and open the first official Microsoft result. Scroll past the Installation Assistant and the media creation tool to “Download Windows 11 Disk Image (ISO) for x64 devices.” The Assistant would try a standard online upgrade and can stop on a compatibility check; the ISO route is the one that keeps your files.
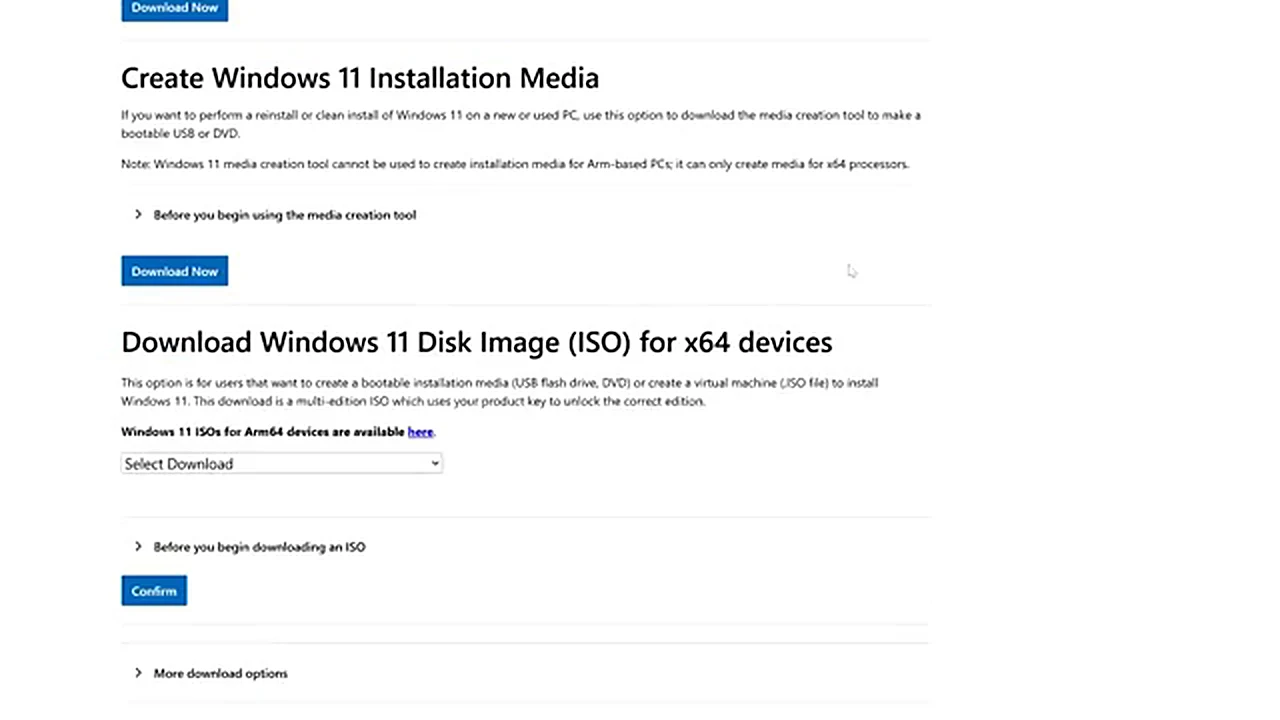
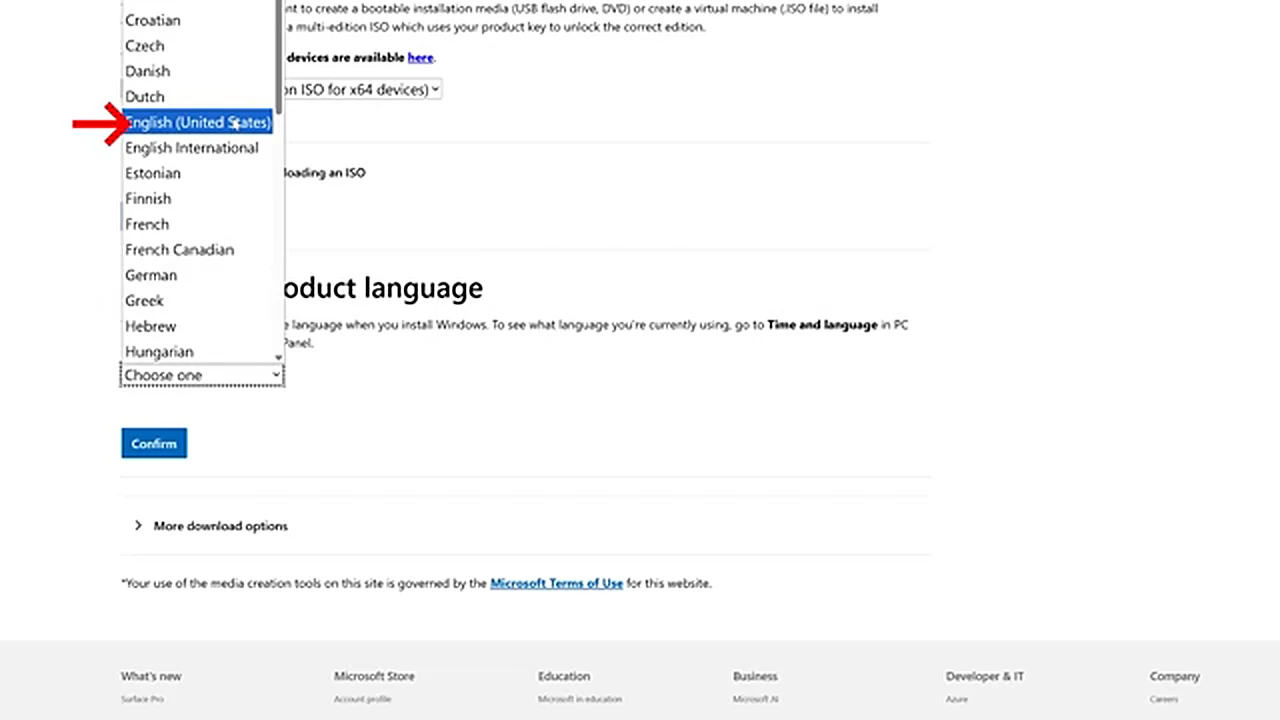
Click “Select Download,” choose “Windows 11 (multi-edition ISO for x64 devices),” and click Confirm. Now comes the choice that trips people up: pick the product language that matches your installed Windows 10. For most readers that is “English (United States),” shown as en-US. If your Windows uses English (United Kingdom), pick that instead. A mismatch can block the keep-everything option later, and you will only find out halfway through. When in doubt, check first, download second.
Check your installed language in thirty seconds
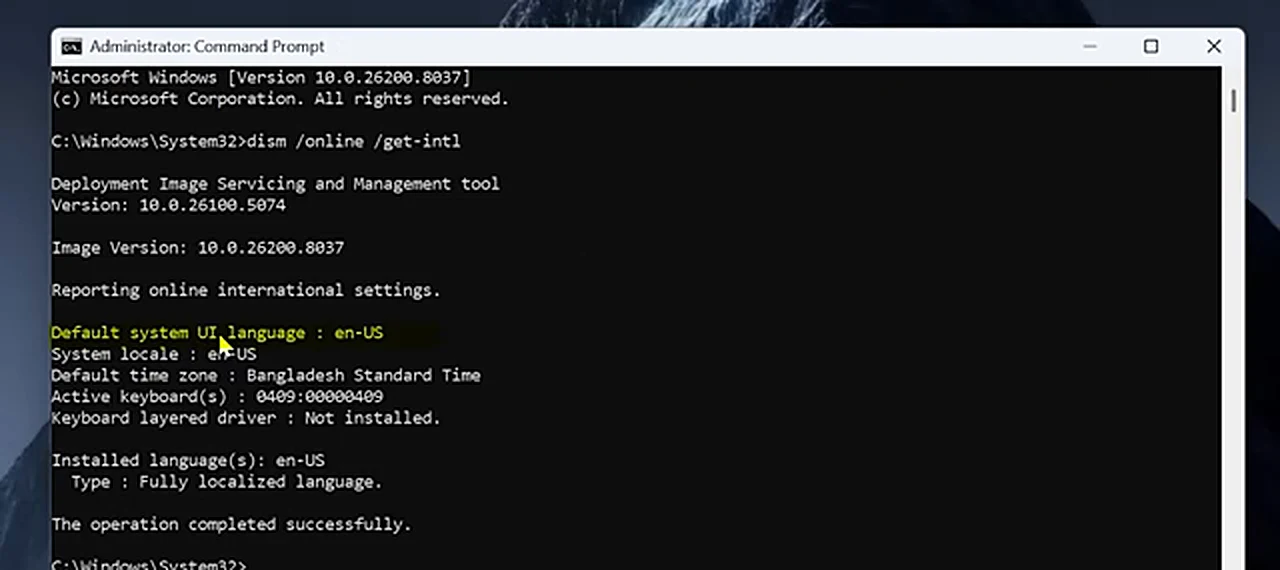
In Windows 10, click Start, type cmd, right-click Command Prompt, and choose “Run as administrator.” Click Yes when asked. Type this command exactly and press Enter:
DISM /Online /Get-Intl
Find “Default system UI language.” If it says en-US, download English (United States). If it says en-GB, download English (United Kingdom). Then confirm the language on the Microsoft page and click the 64-bit Download button. Let the ISO download fully — never start setup from a half-downloaded file.
Unpack the ISO into a folder on the C drive
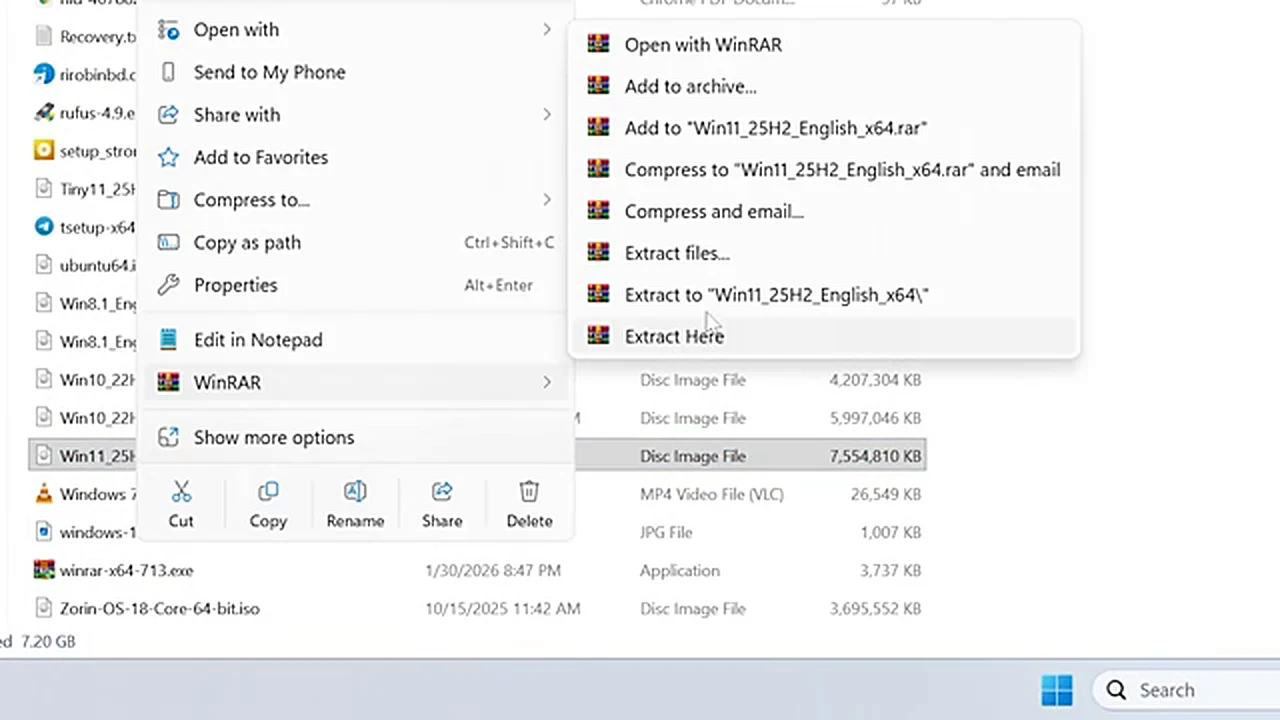
You need a tool that can unpack an ISO file. WinRAR works well; if it is not installed, download the 64-bit version from its official site and install it. Create a folder on the C drive named Win11 — short, no spaces, easy to type. Right-click the downloaded ISO, usually in Downloads, open the WinRAR menu, and choose “Extract files.” Pick Local Disk (C:), open the Win11 folder, and click OK. Wait until extraction finishes completely: the folder should hold the full ISO contents, including setup.exe. Starting setup from half-extracted files is a classic way to get a confusing error.
Run setup the bypass way — and keep everything
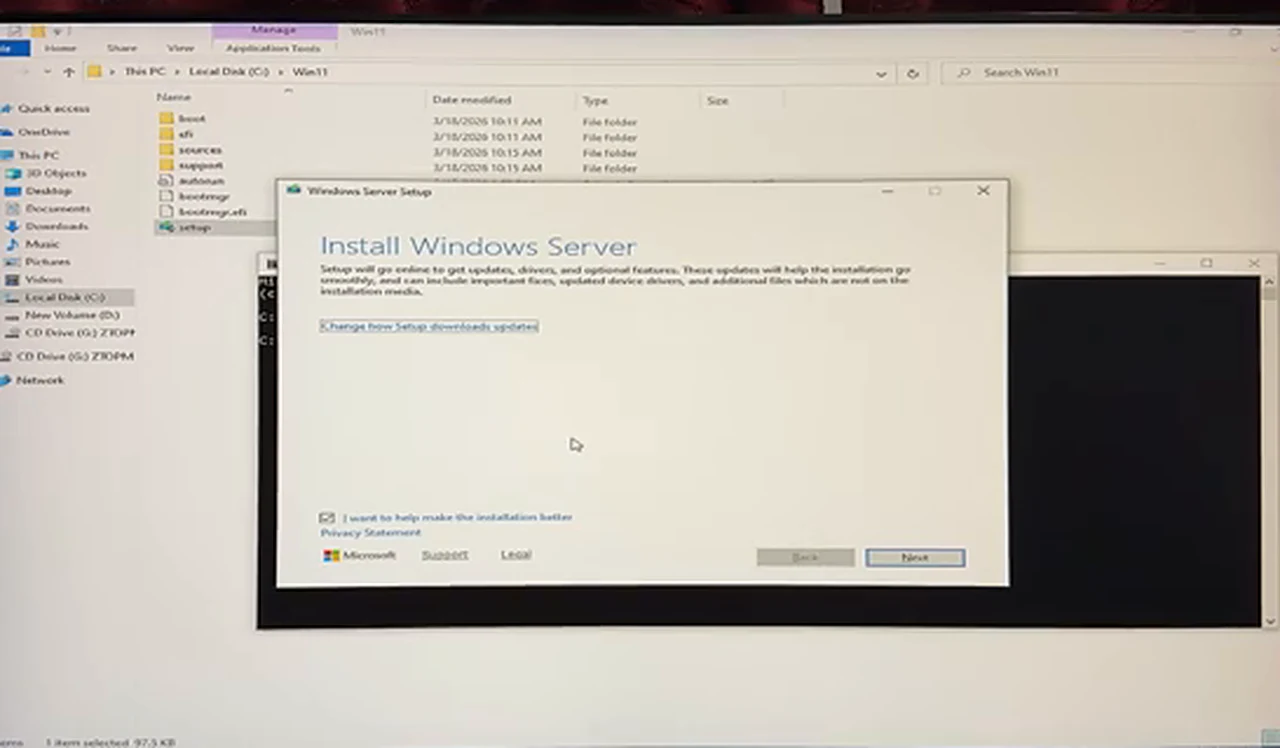
On an older computer, or one without TPM 2.0 and Secure Boot switched on, standard setup can stop with a message that the computer does not meet the requirements. The trick here tells setup it is installing for a server product, which skips that compatibility check. Your files are unaffected. The screens will even say “Windows Server Setup.” That wording looks alarming, but it is expected — it is how you know the switch worked. The finished system is still ordinary Windows 11.
Be clear-eyed about this. It is a widely used workaround, not Microsoft’s officially supported upgrade path for a computer that fails the requirements. It adds no TPM chip and makes no old hardware new, and future updates are not promised. For a personal computer that already runs Windows 10 well, most people find the result perfectly usable — and the rollback window below is your escape route.
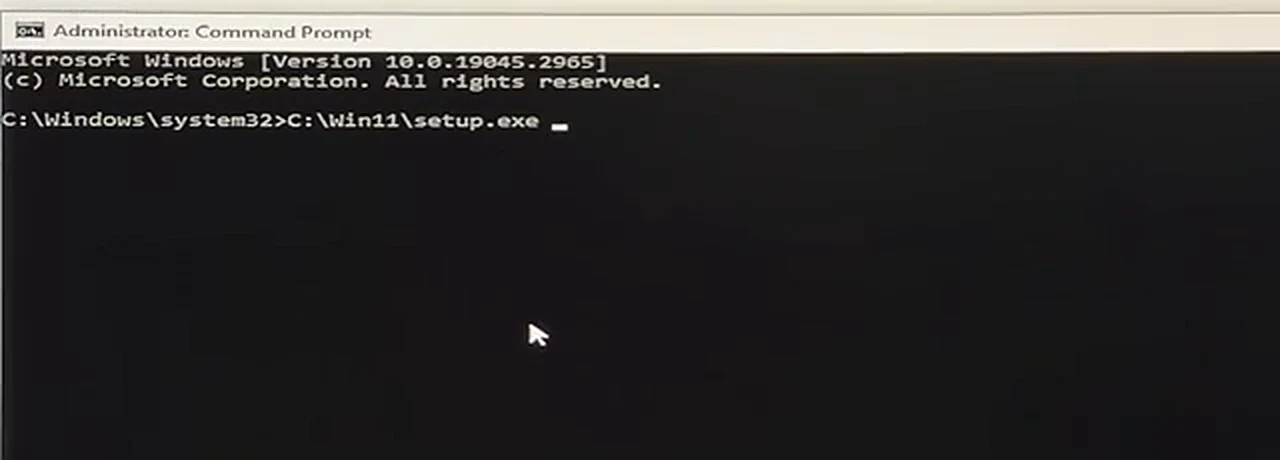
Open Command Prompt as administrator again. Type the path to the setup file, a space, and the switch, then press Enter. For a folder on the C drive named Win11, the command is:
C:\Win11\setup.exe /product server
Type it carefully: folder name, backslashes, and the space before the slash all matter. If the folder is on another drive, change the drive letter to match. Do not run setup.exe by double-clicking it in File Explorer — that runs the normal check and can stop on the compatibility screen.
When the “Install Windows Server” window opens, click Next, then Accept the license terms. The next screen is the most important click in the guide: “Choose what to keep.” Only the first choice does what this guide promises.
- Keep files, settings, and apps — choose this one. Files, programs, and settings carry over.
- Keep personal files only — files stay, but installed programs are removed.
- Nothing — everything is wiped. A clean install in disguise; not what you came for.
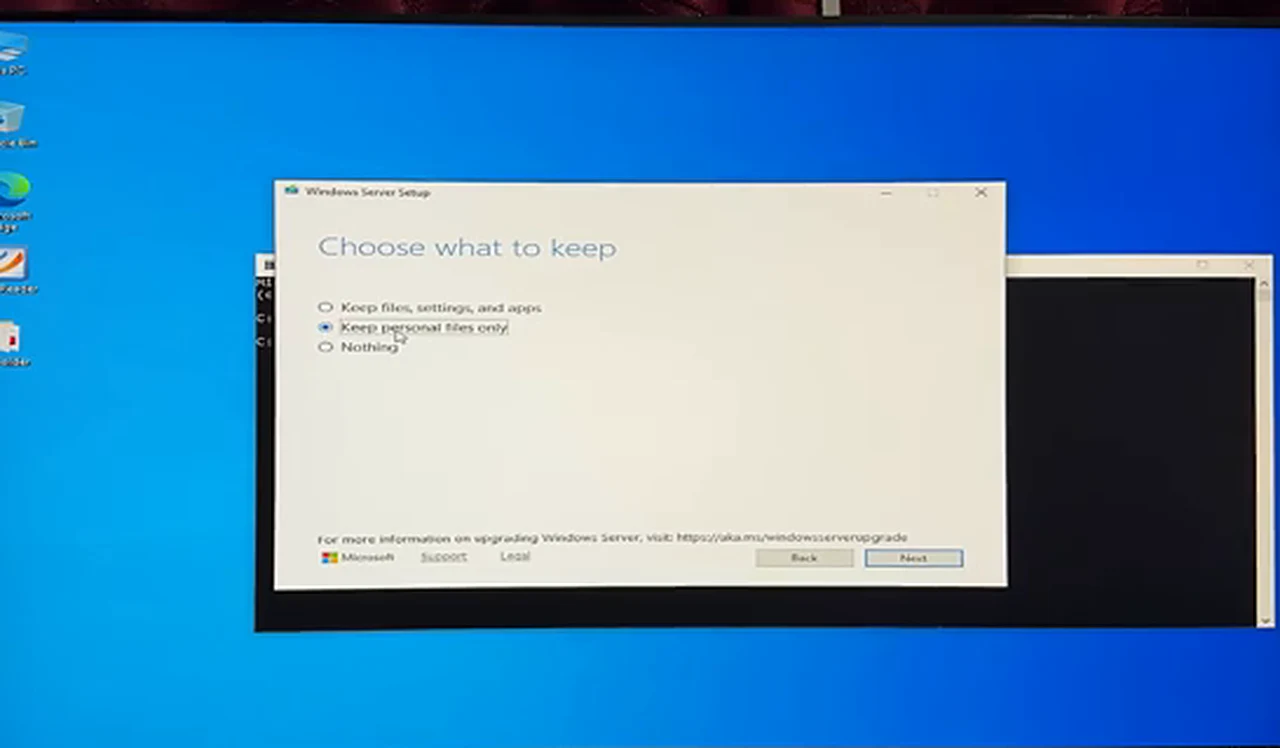
Click Next. Setup shows a summary saying it will install Windows 11 and keep your files, settings, and apps. Read it. If it says anything else, go back and fix the choice or the language mismatch. When the summary is right, click Install.
The long wait: leave the computer alone
Setup now copies files, restarts several times, and finishes on its own. The screen may go black, and around sixty to seventy percent it may restart and look as if it has stopped. Do not press keys, force a restart, or unplug anything. The process can take well over an hour on a slower hard drive. Keep the power connected and wait for the login screen, then sign in with the same password you used on Windows 10.
After the first login: check before you celebrate
Open File Explorer and check Documents, Downloads, Desktop, and Pictures. Open your browser and confirm your bookmarks. Launch the two or three programs you use most and open a real file in each. Most of the time everything is simply there — the quiet payoff for the preparation.
Then let Windows finish its housekeeping. In Settings, open Windows Update and install what it offers. If Windows 10 was activated, Windows 11 will usually activate itself with the same digital license for the same edition; check under Settings, then System, then Activation. After a few days of normal use, delete the C:\Win11 folder to free space. Do not delete Windows.old yet — that folder is your way back.
Changed your mind? You have ten days to go back
Use Windows 11 properly for several days before deciding. If a driver never settles, a program keeps crashing, or performance is clearly worse, the way back is built in. Go to Settings, then System, then Recovery, and choose Go back. Windows may first ask if you want to check for updates. Click “No, thanks” to continue, answer the short questions, and let it restore Windows 10 with your files and programs as they were.
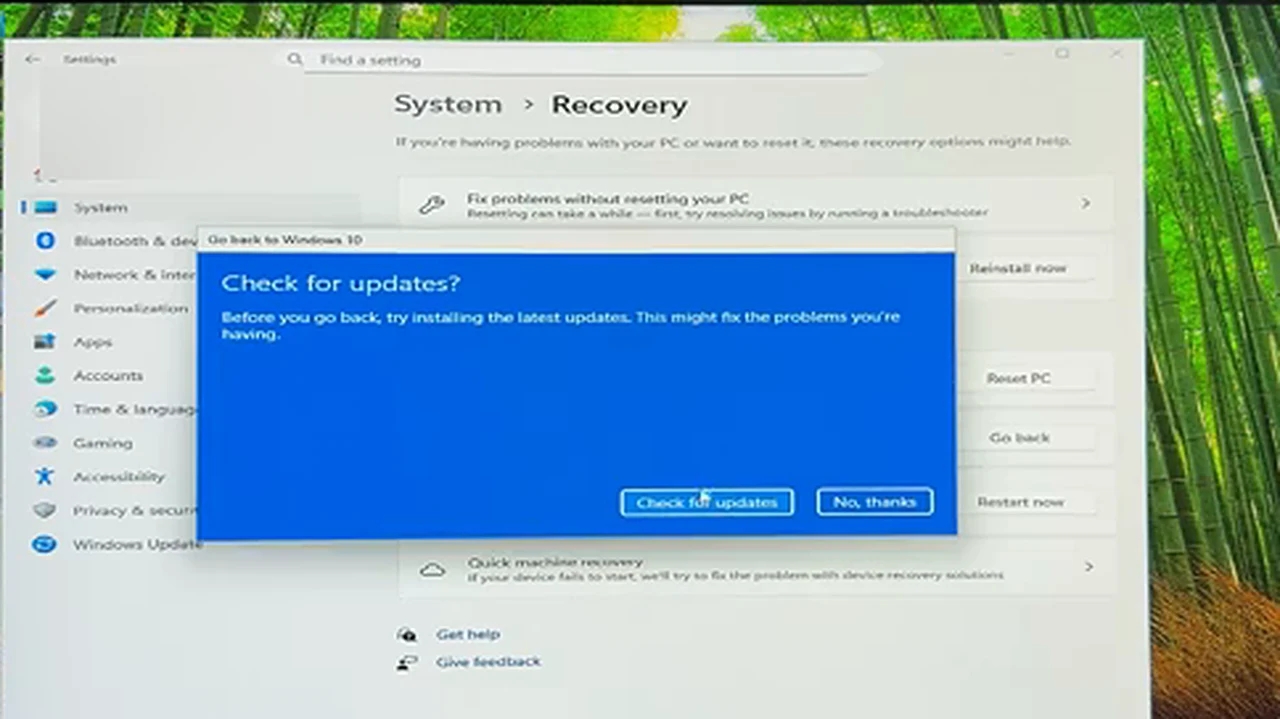
The rollback window is ten days by default and depends on Windows.old still being present. Disk Cleanup on system files, or deleting that folder by hand, can remove the option early. After ten days, going back means a clean install and restoring from backup. Keep your backup until you are sure you are staying on Windows 11.
Upgrade or clean install: pick the right job
Do not confuse this guide with a clean install. A clean install wipes the drive, removes every program, and starts Windows 11 from an empty disk using a bootable USB drive. It suits a computer full of problems, or one being handed to someone else, when everything needed is already saved elsewhere. If that is your situation, follow our separate guide, How to Install Windows 11 26H2 (Clean Install With USB, Even on Unsupported PC), instead.
Watch the full walkthrough
The steps above follow the video walkthrough closely. If a screen looks different on your computer, watch the video and pause it at the matching step.
Common questions
Will I lose my files?
Not if you pick “Keep files, settings, and apps” and the install completes normally. Still make a backup first, because a power cut or a failing drive can damage any install.
Do I need a USB drive?
No. Setup runs from files unpacked on the C drive, so no USB drive or BIOS boot menu is involved. A clean install is the method that needs a bootable USB drive.
My computer fails the Windows 11 requirements. Will this work?
The /product server switch skips the compatibility check, which is why setup says “Windows Server Setup.” It does not upgrade your hardware. Keep the ten-day rollback option in mind.
Setup only offers “Nothing.” What went wrong?
Usually the ISO language does not match your installed Windows language, or setup was started by double-clicking setup.exe. Check the language with the DISM command above, get the matching ISO, extract it again, and run the command from an administrator Command Prompt.
How long does the upgrade take?
Plan for one to two hours, mostly hands-off, and longer on a mechanical hard drive. Start when you do not need the computer, keep it plugged in, and wait for the login screen.
Done carefully, an upgrade to Windows 11 feels less like rebuilding a computer and more like waking up to a tidier version of the one you already had. Back up first, match the language, choose the keep-everything option, and let the computer finish. Give yourself the ten-day trial before deleting anything.