Grub2Win is easy to install and surprisingly easy to forget about. You set up a second operating system for a trial, a boot menu appears every time you switch the computer on, and then the novelty wears off. The second system sits unused, the menu keeps asking which system you want, and getting back to plain Windows startup feels harder than it should. It is not. It is two jobs, done in the right order: remove the second system’s partition, then uninstall Grub2Win itself. Skip one of them and something is left behind — either wasted disk space or a boot menu with nowhere to go.
One naming snag is worth clearing up first. The video this guide follows is titled with a spelling that looks like “Grab2Win.” The program on screen is Grub2Win, the Windows tool that installs the GRUB boot menu so a computer can offer more than one operating system at startup. Everything below uses the name as it appears in Programs and Features: Grub2Win. In the example here, the second system is ChromeOS Flex, set up as a dual-boot trial alongside Windows. If your second system is different, the same two-job logic still applies — but check the partition labels twice before you delete anything.
Part A: The 5-Minute Fast Path
Read this part if you already know which drive holds your second system and just want the sequence. Do the backup check in step 1 even if you are in a hurry — deleting a partition cannot be undone.
- Save anything you still need from the second system, back up your Windows files, and note the second system’s drive letter, label, and size in This PC.
- Right-click the Start button, open Computer Management, and click Disk Management under Storage. Find the same partition again by its label and size.
- Right-click that partition, choose Delete Volume, and confirm. It should turn into unallocated space.
- Open Control Panel, go to Programs and Features, select Grub2Win, and click Uninstall. Let it scan your disks and partitions and finish.
- Check that Grub2Win is gone from the program list. Restart the computer. It should go straight into Windows with no boot menu in between.
That is the whole job when everything behaves. If the menu is still there after the restart, if Delete Volume is greyed out, or if you are not sure which partition is which, stop and read Part B.
Part B: The Complete Guide
Before you start: know what you are removing
A dual-boot setup has two separate pieces, and people mix them up all the time. The first piece is disk space: the second operating system lives in its own partition, a fenced-off section of a drive. The second piece is the boot menu: Grub2Win puts GRUB in charge of the first choice you make at startup, so Windows no longer boots by itself. Uninstalling Grub2Win alone leaves the partition behind. Deleting the partition alone leaves the menu behind, pointing at a system that no longer exists. You need both steps, and the video does them in that order — partition first, bootloader program second.
ChromeOS Flex adds one quirk worth knowing. In the video, its setup did not let the user pick a drive in the usual way. It set itself up automatically and formatted the drive it landed on. With two drives in that computer — an SSD and a hard disk — the hard disk was the one that got formatted, while the SSD was left alone. Before installing any system that formats automatically, disconnect any drive you cannot lose. For this removal, the lesson is simpler: do not assume a partition is safe because it is small, or dangerous because it is large. Read its label.
Step 1: Identify the second system in This PC
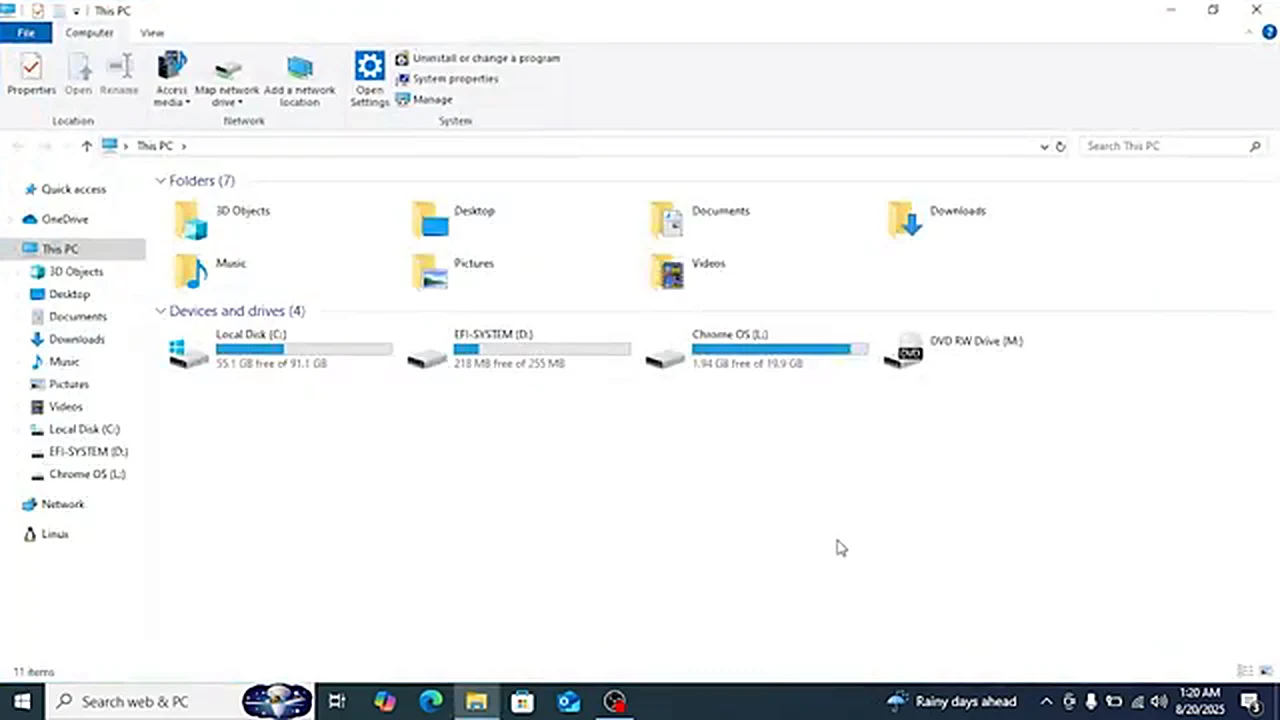
Open This PC and look under Devices and drives. In the video, Windows sits on Local Disk (C:), and there is a separate drive labelled Chrome OS (L:), with about 1.94 GB free out of 19.9 GB. There is also a small EFI-SYSTEM (D:) drive. Write down the letter, label, and size of the second system first. That note is your anchor, because Disk Management shows the same drives in a different layout. While you are here, open the second system one last time if you can still boot into it, and copy out any files you want to keep. Once the partition is deleted, recovery is a specialist job.
Step 2: Open Disk Management and find the same partition
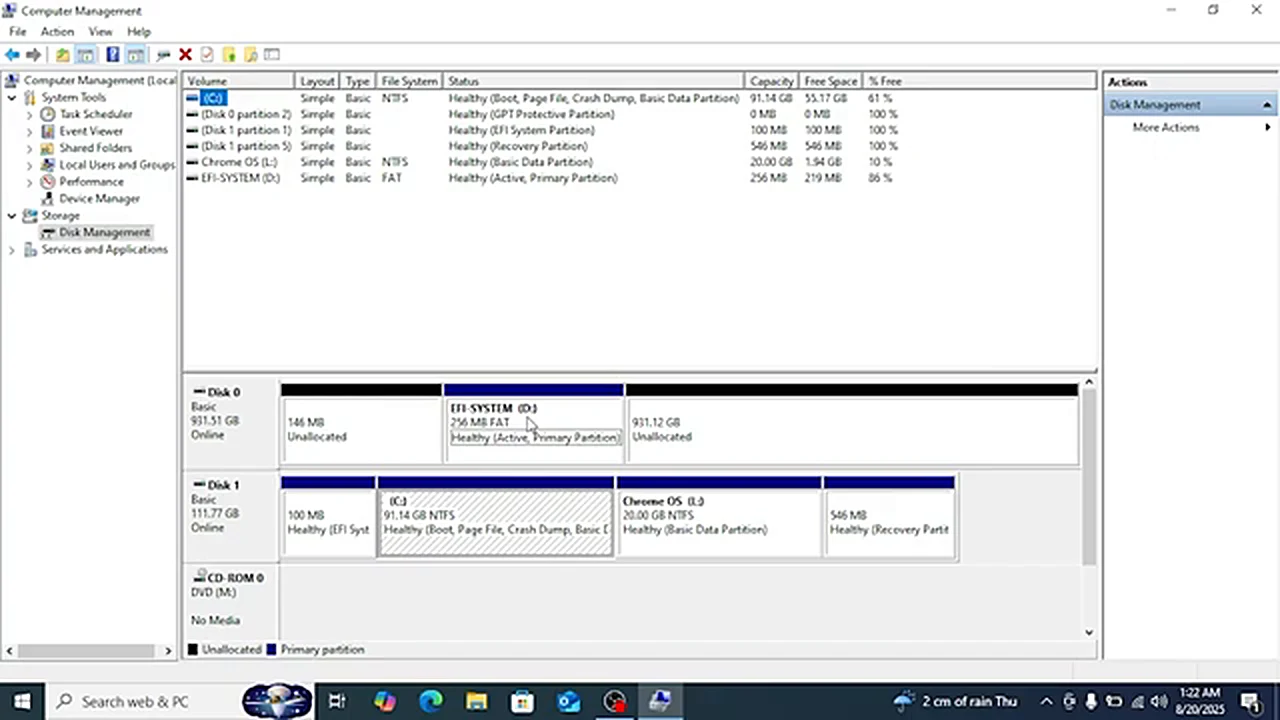
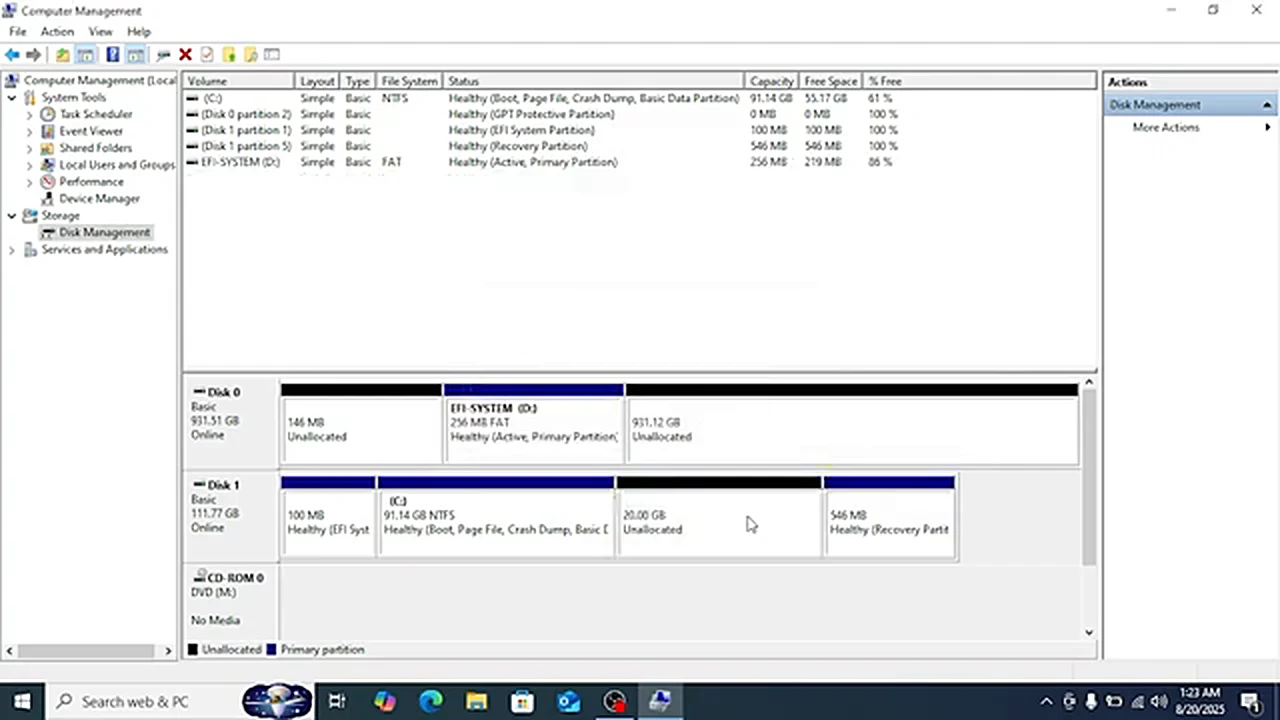
Right-click the Start button and choose Computer Management. In the left pane, expand Storage and click Disk Management. The top list shows volumes with their letters, file systems, and health status; the bottom half shows the physical disks as horizontal bars. In the video, the Chrome OS partition is a 20.00 GB NTFS volume on the same disk as the Windows C: partition. That match — label plus 20 GB — is how you know you have the right block. If the label and size do not match your note from This PC, do not proceed. Leave three partitions alone: C:, the small EFI system partition, and the recovery partition.
Step 3: Delete the second system’s volume
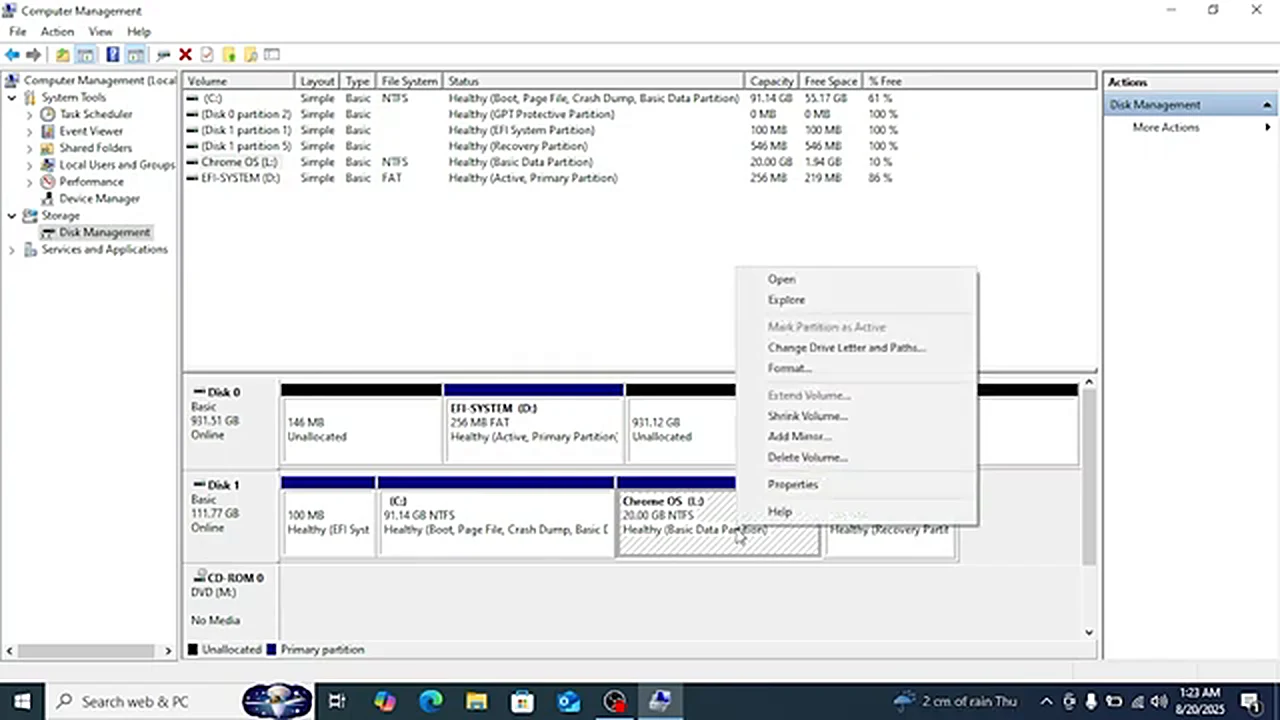
Right-click the second system’s partition — in the video, the Chrome OS block — and choose Delete Volume. Windows will warn you that all data on the volume will be lost. If you have already copied out everything you need, confirm it. The partition turns into unallocated space, shown in black in the disk bar. In the video, the 20.00 GB Chrome OS block becomes 20.00 GB of unallocated space, with the neighboring Windows partition untouched. The second system is gone, but the job is only half done. If you restart now, the Grub2Win menu may still appear, because the program that shows the menu is still installed. Do not try to fix that by deleting more partitions. The menu is software. Remove the software.
Step 4: Uninstall Grub2Win from Programs and Features
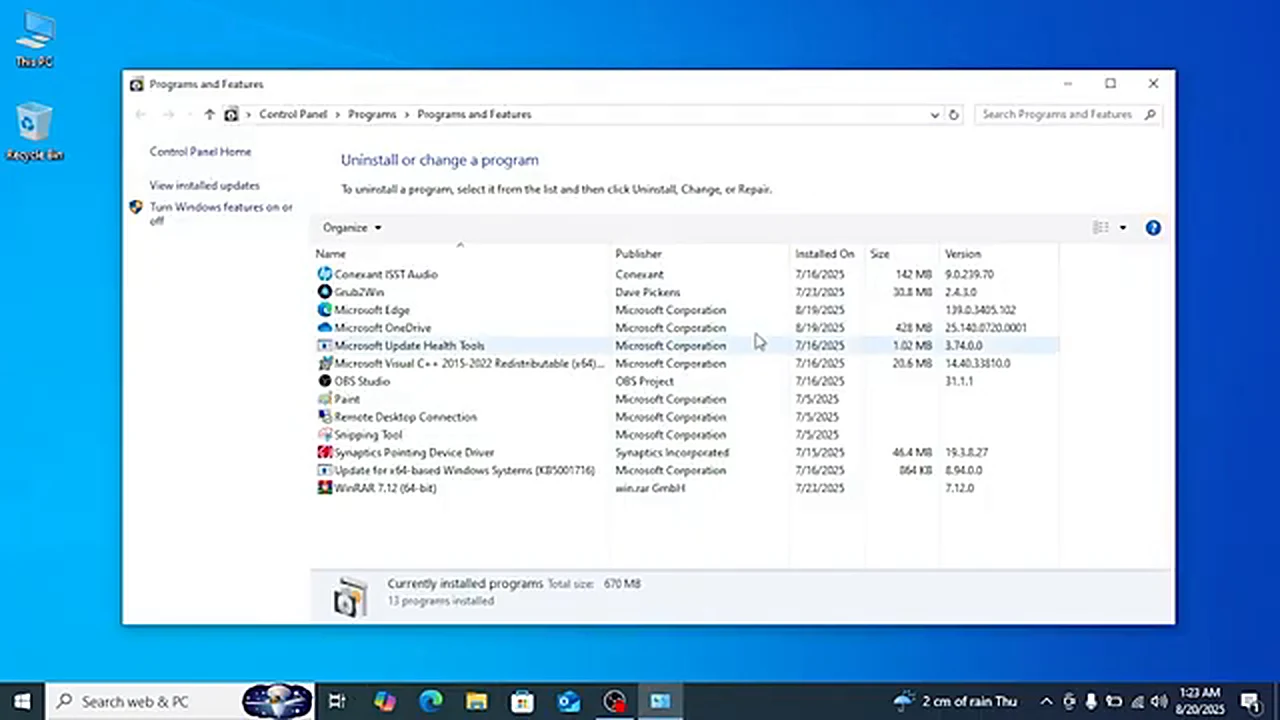
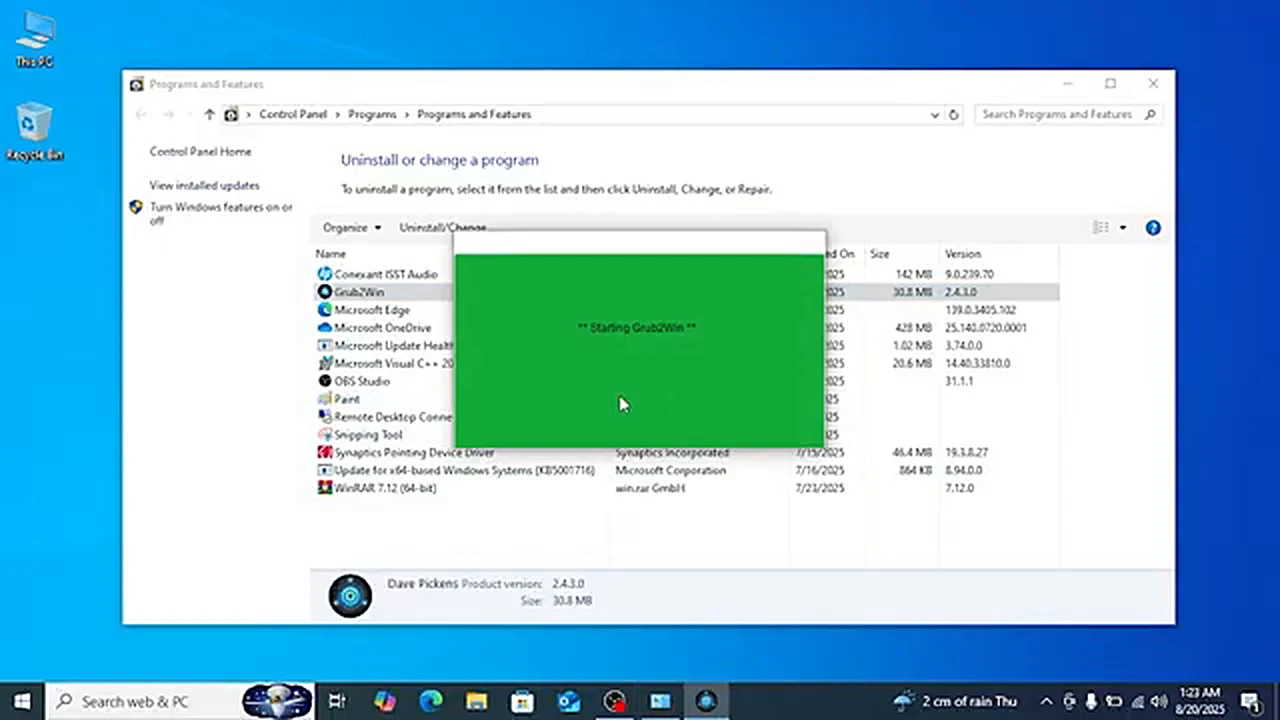
Open Control Panel and go to Programs and Features. Grub2Win appears there under its own name — in the video, version 2.4.2.0, about 30.8 MB. Select it, click Uninstall at the top of the list, and confirm. The uninstaller does not just delete program files. It scans your disks and partitions and works out what needs to change in the boot setup so Windows takes over again. Let that scan finish without clicking around or opening Disk Management at the same time. You may also see Grub2Win in the Start menu, under G, but that entry is just a shortcut. Removing the shortcut alone would not remove the boot menu, so use Programs and Features for the actual uninstall.
Step 5: Check the result, then restart
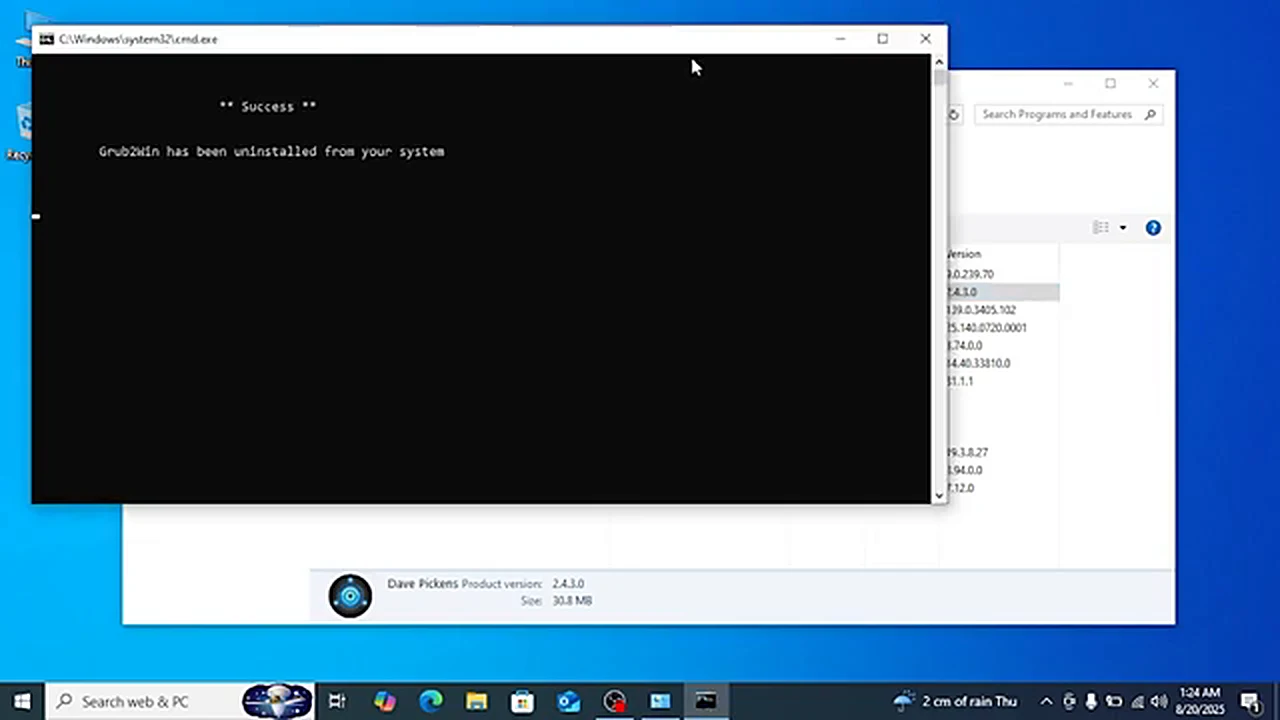
When the uninstaller finishes, look at the Programs and Features list again. In the video, Grub2Win is no longer there, while the programs above and below it are still listed — exactly what you want to see. If Grub2Win is still listed, restart and try the uninstall once more. Then restart for the real test. A successful removal means the computer goes straight into Windows. In the video, that is what happens: the restart goes directly to the Windows desktop. If you still see a menu, read the edge cases below before deleting anything else.
Edge cases: when the clean version does not happen
The uninstall log shows DiskPart errors — but Grub2Win is gone
During the uninstall in the video, an EFI Update Log window appears and fills with DiskPart error lines, repeating a return code and “Error 0.” That looks alarming, and on a first reading it sounds like the uninstall failed. It did not, in this case. The Grub2Win entry still disappeared from Programs and Features, and the restart still went straight into Windows. Judge the uninstall by its result: entry gone from the list, and a clean restart. If both are true, the error lines were noise from the scan checking drive letters it no longer needed. If the entry or the menu is still there, run the uninstall again with no disk tool open at the same time.
The boot menu still appears after the restart
The video flags this honestly: if another boot option still appears at startup, it needs a separate fix, and the fix depends on the disk layout — in the video’s words, on having a GPT partition setup. The video does not show that fix, so this guide will not pretend otherwise. Check the simple things first. Enter your firmware setup (usually with Delete, F2, or F12 at startup) and look at the boot order. Windows Boot Manager should be first. If a ChromeOS or GRUB entry is still listed ahead of it, move Windows to the top, save, and restart. In Windows, you can also press Windows + R, type msconfig, and look at the Boot tab — but only remove an entry if you are certain it belongs to the system you just deleted, and never remove the entry Windows is running from. If neither check clears the menu, get help with your exact disk layout in front of you — deleting the EFI system partition to silence a menu can stop Windows from booting at all.
Delete Volume is greyed out, or the freed space needs a home
A greyed-out Delete Volume usually means the partition is in use, is a system partition, or you right-clicked the disk itself instead of the partition block. Close any File Explorer window showing that drive, make sure you are not booted into the second system, and right-click the partition block in the lower half of Disk Management. If the option is still greyed out, stop and check again — a partition Windows refuses to delete is often one Windows needs. Once the deletion goes through, the 20 GB of unallocated space needs a decision. If it sits directly next to C: on the same disk, right-click C: and choose Extend Volume. Otherwise, right-click the unallocated space and create a new simple volume for storage, with a clear label like Storage. Leaving it unallocated is also fine if you plan another trial later.
Quick answers
Does removing Grub2Win delete Windows? No, if you follow the steps above. The uninstaller changes the boot setup back to Windows; Windows itself and your files on C: are not the target. The real risk is deleting the wrong partition, which is why the label-and-size check comes before every delete. Can you just delete the partition and leave Grub2Win installed? The menu will keep appearing, and choosing the deleted system will fail — so finish the second job and restart to confirm the menu is gone. Do you need a USB drive? No. Everything here uses tools already in Windows.
Know which piece does what, and remove both pieces. The partition holds the second system. Grub2Win holds the menu. Delete the partition, uninstall the program, restart, and check that Windows boots on its own. Keep the note you made in step 1 — letter, label, size — and the next removal will take five minutes.