I remember the moment I almost backed out. The installer was open, my cursor hovered over Continue, and every worst case ran through my head: what if Windows disappears, what if my photos go with it. I had wanted to try Linux for months, but I had spent years building up the Windows side of that machine. So I came back the next day with a backup and a plan, and I read every screen before I touched it.
If that fear sounds familiar, this guide is for you. It follows a real Linux Mint Dual Boot setup beside Windows 11 or Windows 10, with the exact moments where first-timers hesitate. You do not need to be a Linux expert. You need patience, a backup, and the discipline to pick the right option on one screen.
Will Linux Mint Dual Boot Delete Windows? The Honest Answer First
No, a Linux Mint dual boot does not have to delete Windows. The installer has an option, Install Linux Mint alongside Windows Boot Manager, which keeps Windows and adds Mint beside it on the same drive. Your Windows files stay in their own space, Mint gets its own space, and you choose which system to open at startup.
But the fear is not silly. The same installer also has an option that erases the disk and installs only Mint. One wrong choice there, and Windows is gone. A power cut halfway through, or a USB drive pulled out too early, can also cause real trouble. So this guide starts with a backup and a two-minute disk check. The risk is manageable. It is not zero.
How This Method Differs From the Zorin Install Without a USB Drive
This site already has a guide for installing Zorin OS without a USB drive, using a small temporary partition as a bootable drive. This Linux Mint guide is different, so do not mix the two sets of steps. Here you do need a USB pendrive, you build the bootable drive with Rufus, and the installer divides the space with a slider. If you have no pendrive, read the Zorin OS without USB guide instead.
Before You Touch Anything: Back Up, Then Check GPT or MBR
Back up first. Copy your documents, photos, and anything you could not replace to an external drive or cloud storage. The alongside option is designed to leave your files alone, but a backup turns a bad day into an inconvenience instead of a disaster. I backed up the night before and started fresh in the morning.
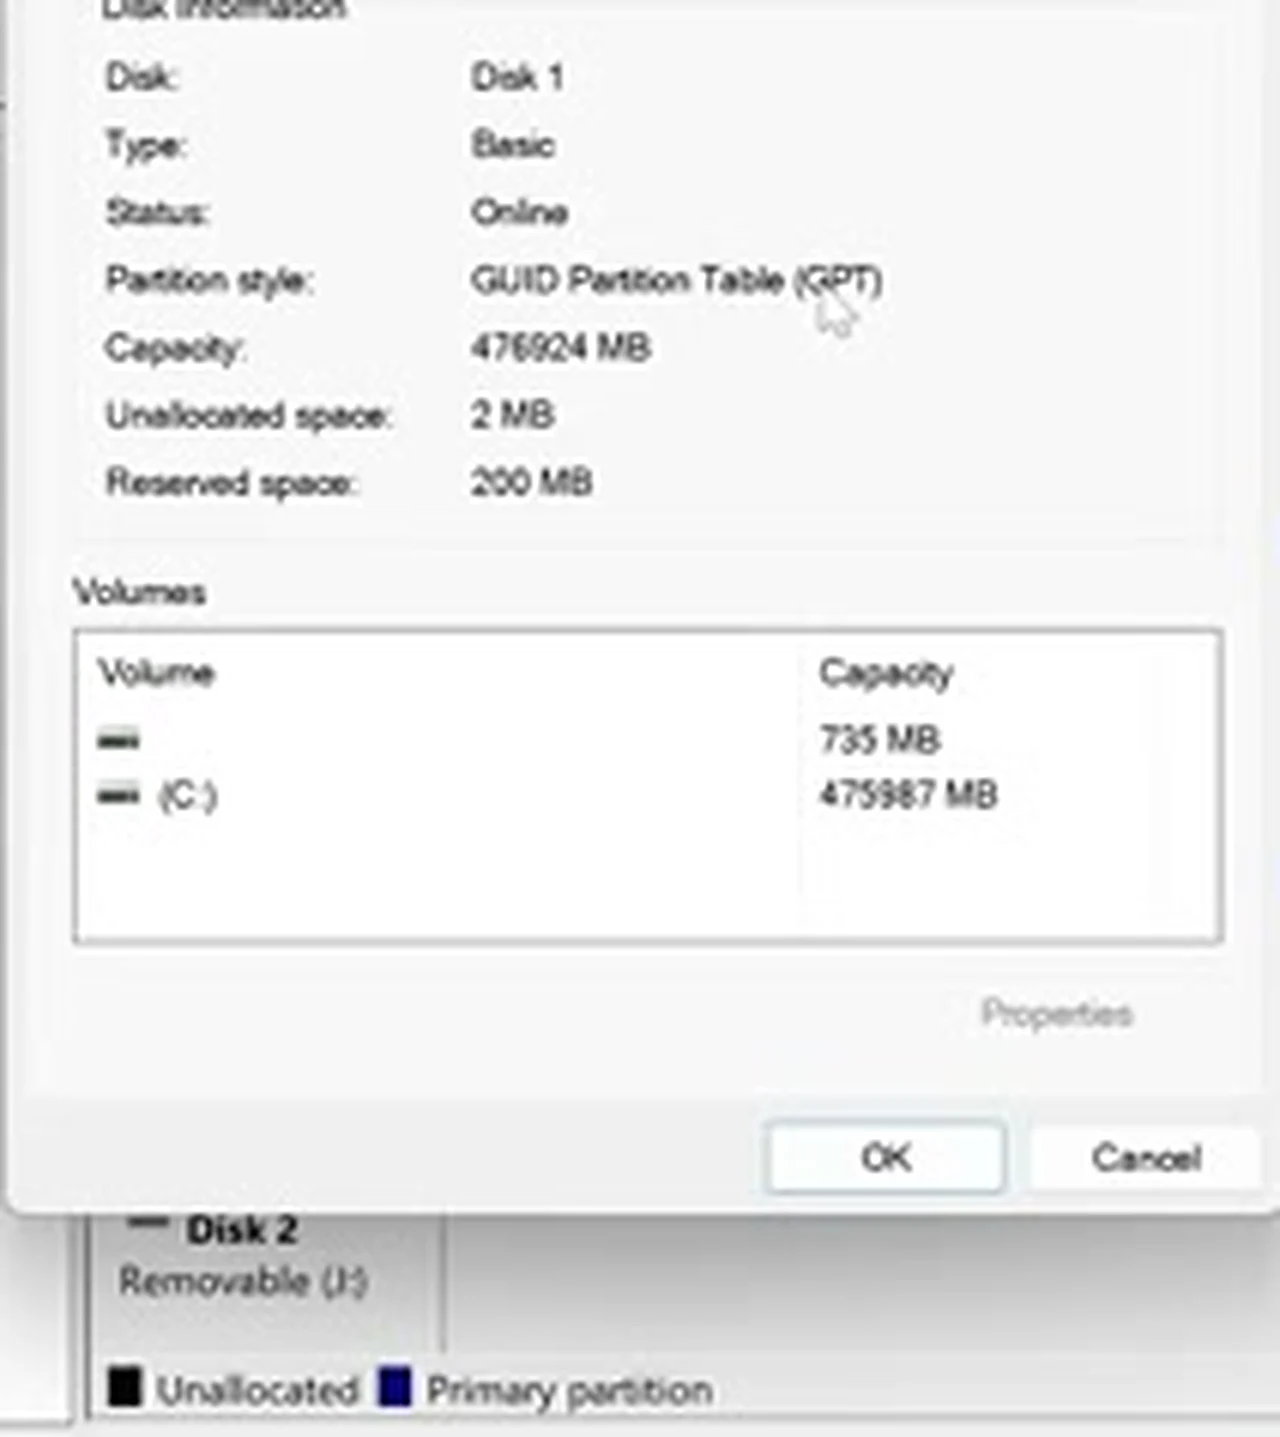
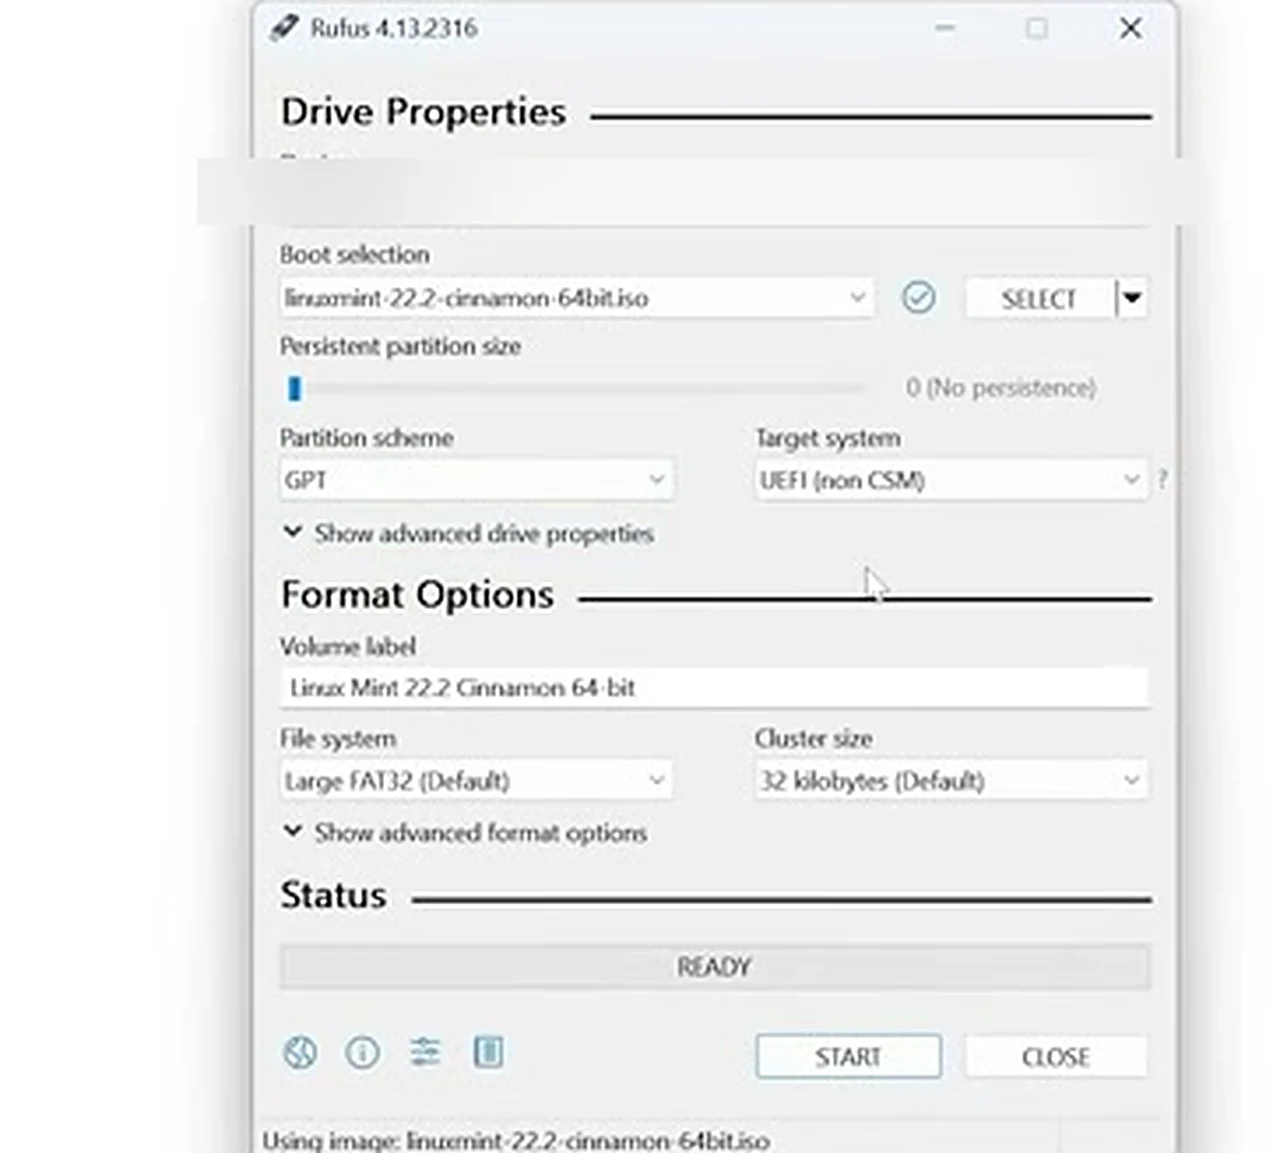
Next, find out whether your disk uses GPT or MBR, because Rufus must match it. Right-click This PC, open Manage, then go to Disk Management. Right-click the disk itself, choose Properties, and open the Volumes tab. The Partition style line will say GUID Partition Table (GPT) or Master Boot Record (MBR). In the video the disk was GPT, so Rufus used GPT with UEFI. If yours says MBR, choose MBR instead.
While you are there, check the free space on the drive where Windows lives. Mint will live on that same drive, so aim for at least 30 GB free for Mint, and more if you plan to install many programs. The setup in the video gave Mint about 53.7 GB. If your Windows drive is nearly full, free up space before you start.
The Download: Linux Mint Cinnamon and Rufus
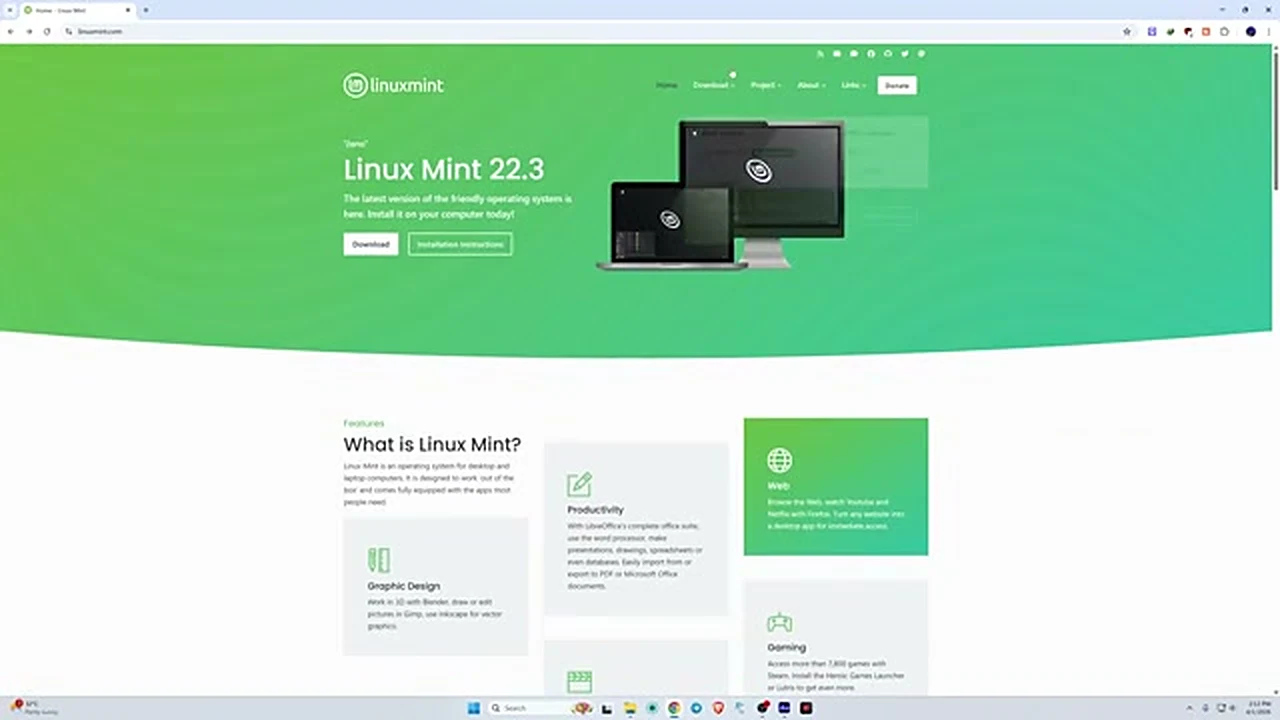
Search for Linux Mint and open the official linuxmint.com site. Pick the Cinnamon edition. It looks and behaves the most like a familiar desktop, with a start menu and a taskbar. Choose Cinnamon on the download page and download the ISO file from a nearby mirror. It is a large file, a few gigabytes, so let it finish completely. In the video the download took around ten minutes.
While the ISO downloads, get Rufus from its official site. Rufus is a small, free tool that turns a USB drive into a bootable installer. You need a pendrive you are happy to erase completely, because Rufus will format it. Eight gigabytes is enough for the Mint ISO. Plug the drive in, but keep anything important off it.
Making the Bootable USB Drive With Rufus
Open Rufus and click Yes when Windows asks for permission. Your pendrive should already be selected under Device. If more than one drive is plugged in, check the name and size carefully. Click Select, find the ISO, and open it. Set the Partition scheme to match your disk: GPT for GPT, MBR for MBR. Click Start, click OK on the format warning, and close Rufus when it says Ready.
Finding Your Boot Menu Key Before You Restart
A computer does not automatically boot from a USB drive just because one is plugged in. You must press a key during startup to open the boot menu. That key differs by brand: F9 on the HP laptop in the video, often F12, F8, Esc, or F2 elsewhere. Search now for your model plus boot menu key. If the drive does not appear, try a different USB port; in the video, the second port worked at once.
Booting Into the Live Mint Desktop
Move the pendrive to the computer where you want Mint installed. Power it on and press your boot menu key right away. Select the USB drive, press Enter, leave Start Linux Mint selected, and press Enter again. You will reach the Mint desktop without installing anything. Try the live session first; nothing is permanent until you run the installer. When ready, double-click Install Linux Mint.
Inside the Installer: Language, Wi-Fi, and Codecs
Keep English as the language, or pick the language you read warnings in most easily. Keep the default keyboard layout and continue. You can skip Wi-Fi for now; installation works offline. Then tick the box to install multimedia codecs. Without them, some videos and music will not play properly.
The Screen That Decides Everything: Installation Type
Now comes the screen I had feared, and it was clearer than I expected. The first option is Install Linux Mint alongside Windows Boot Manager. The second is Erase disk and install Linux Mint. The third is Something else, for manual partitioning. For a dual boot, choose the first option only. The erase option deletes everything, including Windows. Read the descriptions slowly; the right choice says alongside Windows in plain words.
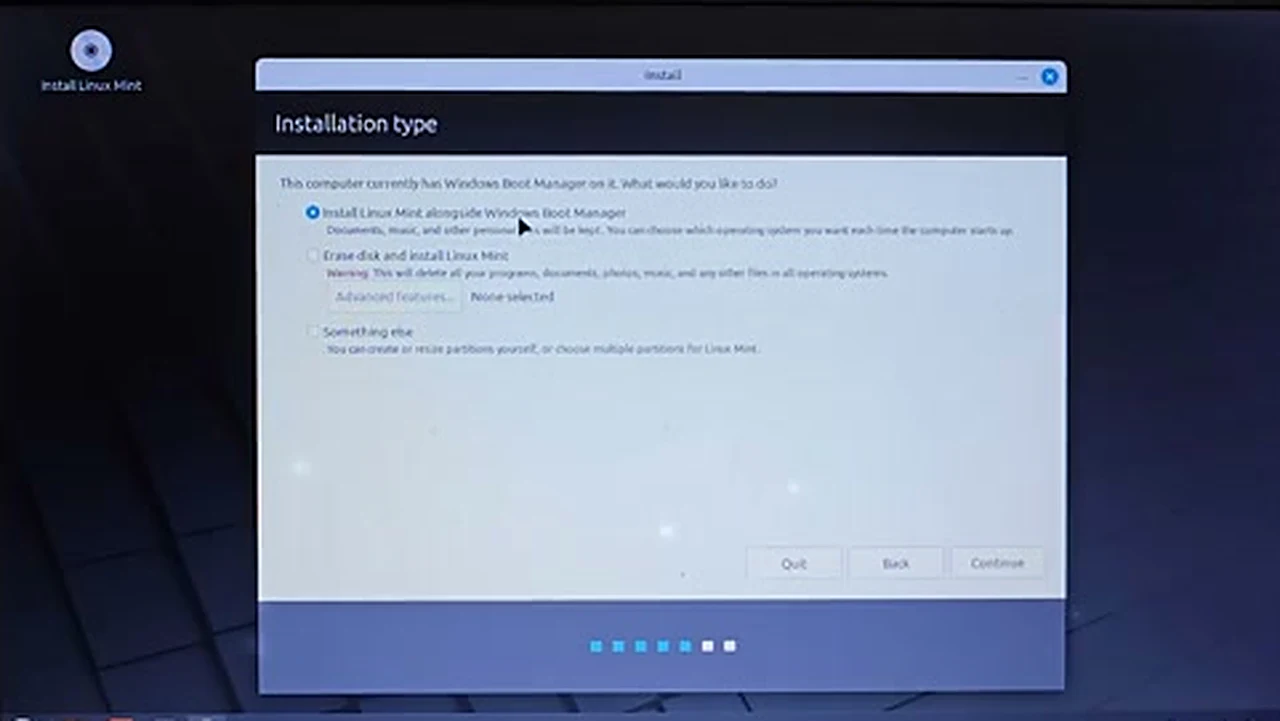
Click Continue, and the installer will show the drive that already has Windows on it. In the video the machine had more than one drive, but the installer selected only the SSD with Windows. The other drive was left alone. Check that the selected drive is the one with Windows before you go further.
The Slider That Scared Me, Explained Calmly
The next screen shows two boxes: Files, the space Windows keeps, and Linux Mint, the space Mint will get. Drag the divider between them to decide how much room each side keeps. It looks like you are cutting Windows in half. You are not deleting anything. It only decides how much free space Mint may use; the installer creates its own partition automatically. You do not need to shrink anything in Windows first.
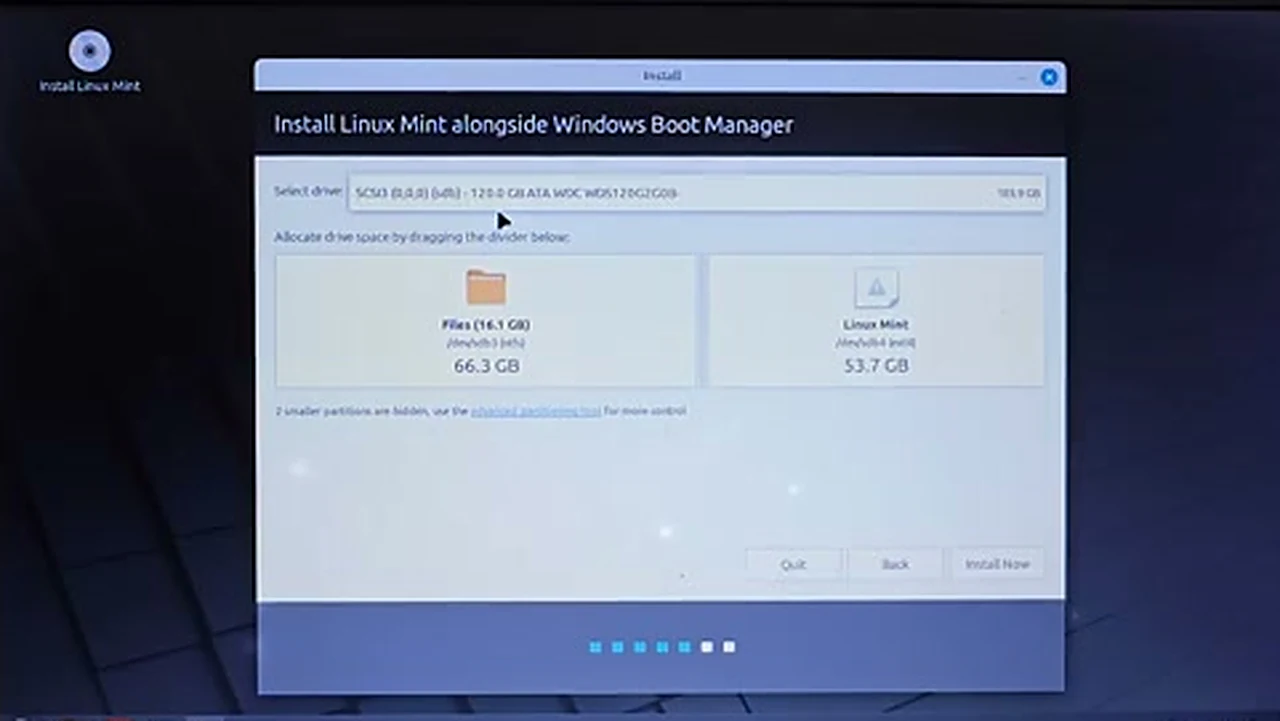
Give Mint at least 30 GB. In the video the divider ended up near 53.7 GB for Mint, with about 66.3 GB left for files on the Windows side. Once the numbers look right, click Install Now. A confirmation box will warn that changes will be written to the disk. That is the last clear checkpoint. Read it, make sure it describes the drive you expect, and click Continue.
Timezone, Your Name, and a Password You Must Remember
While files copy, the installer asks where you are. Click your location on the map, or pick your time zone. For readers in Bangladesh, that means the Dhaka time zone. Then set up your account: your name, a username, and a password you will remember, because Mint will ask for it at login and for updates. When installation is complete, click Restart Now, remove the USB drive when asked, and press Enter. Leaving the drive in can send the computer back into the live session.
The First Restart Surprise: When Windows Opens Instead
Here is the part nobody warned me about, and it happened in the video too. After the first restart, the computer opened Windows directly. No menu, no choice, no sign Mint was there. It felt like the installation had failed. It had not. Some computers boot straight into Windows unless you tell them otherwise. Restart, press your boot menu key, and open the boot menu again.
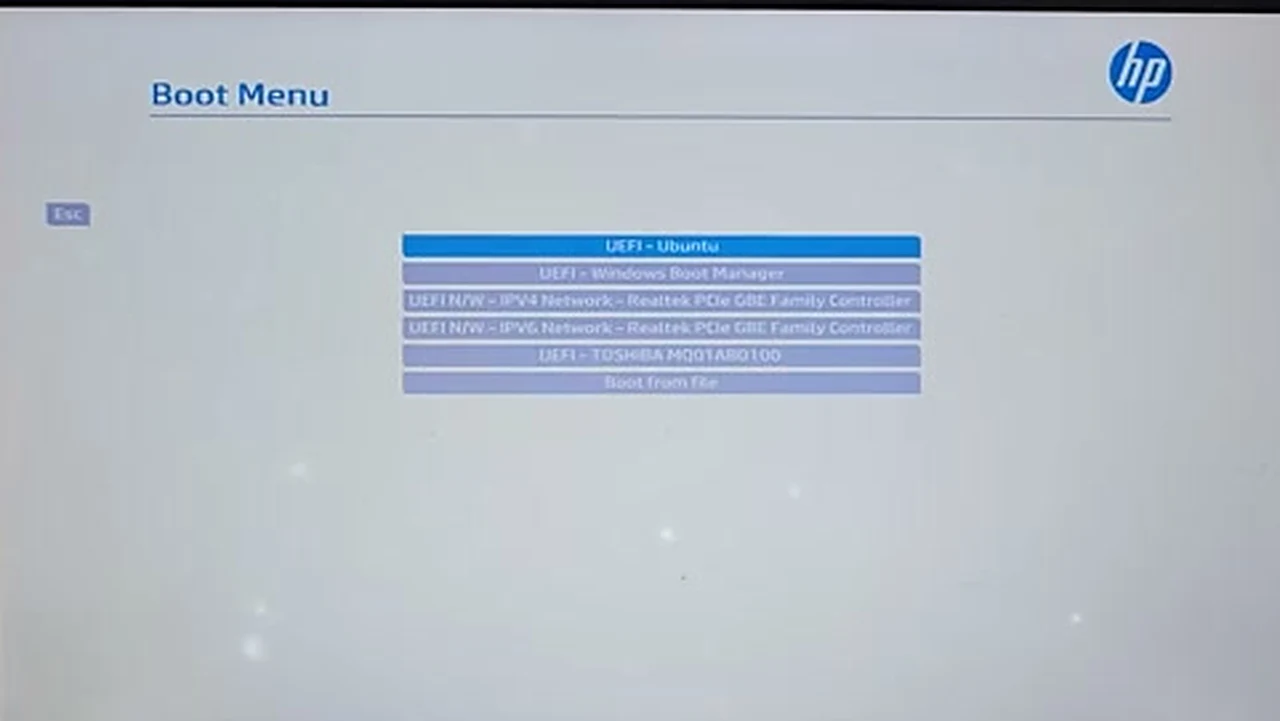
Look for UEFI – Ubuntu at the top, above Windows Boot Manager. Mint is built on Ubuntu, so the firmware lists it under that name. Select it and press Enter. A dark menu called GNU GRUB will appear, listing Linux Mint first. Leave it selected and press Enter. Mint will start and ask for your password. On many computers, that GRUB menu appears automatically on every startup.
First Hour in Mint: Drivers and Updates
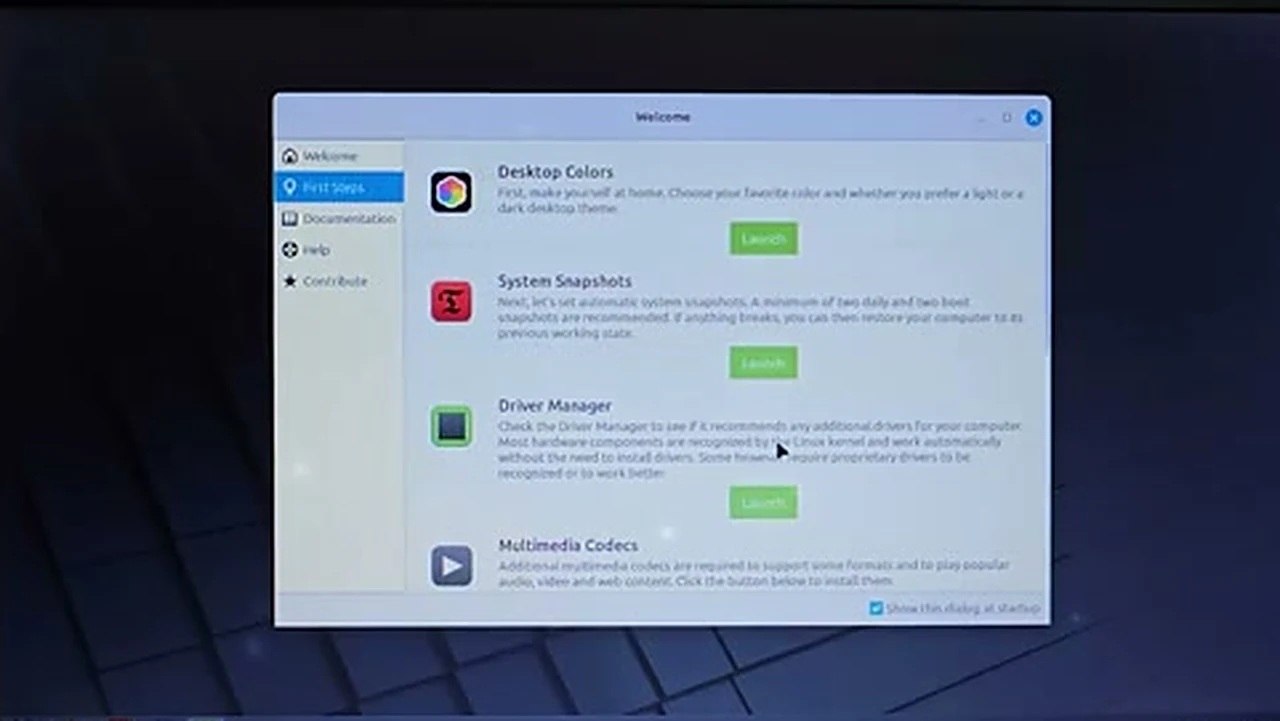
Connect to the internet and open the Welcome window. It points you to the Driver Manager, which recommends extra drivers Mint does not install by default. Install what it recommends, especially for graphics and Wi-Fi, then run the system updates and restart once more.
If Something Goes Wrong: Three Checks Before You Panic
Most dual boot problems have a few causes. First, if no system starts, the scheme and firmware mode may not match: GPT needs UEFI, MBR needs the legacy setting. Second, check the firmware for Secure Boot and Legacy/UEFI options; toggling one of them lets the Mint entry boot on some machines. Change one setting at a time and test. Third, if the USB drive never appears, try another port and rebuild it in Rufus.
The Rollback Path: How to Remove Mint Later
Removing Mint is possible, but it is not a one-click removal. First, copy anything you created inside Mint to Windows or an external drive. Then, from Windows, open Disk Management, delete the Mint partitions, and give that space back to Windows. Finally, repair the Windows bootloader, so the computer starts without looking for GRUB. Skip that step and the computer may fail to start. If that sounds beyond what you are comfortable doing, get help first. For more on Windows disk space, see the guide to partitioning a hard disk or SSD in Windows.
Watch the Full Setup
The video below shows the whole process on screen, including the moment the computer opened Windows first and had to be sent back through the boot menu. Watch it once before you start, then follow this guide beside it while you work.
Questions I Asked Myself Afterwards
Can I still use all my Windows programs?
Yes, in Windows. Dual boot does not change Windows itself. Mint cannot run most Windows programs directly, so keep Windows for those.
How much space does Linux Mint need?
At least 30 GB for a comfortable start. The video setup used about 53.7 GB. Below 20 GB, updates and everyday use get cramped quickly.
Do I really need a USB drive for this method?
For this method, yes. If you have no pendrive, the Zorin guide on this site uses a different approach that needs no USB drive at all.
What if my computer always boots into Windows?
Open the boot menu and choose the UEFI – Ubuntu entry. On many machines the GRUB menu then appears on every startup, and changing the boot order in firmware so the Ubuntu entry comes first usually fixes it.
I started afraid of one screen. I finished with two systems on one machine and a better sense of how my computer starts up. Take your time, read each screen, and let the fear make you careful, not stop you.